As part of a project I’m working on, I wanted to be able to do some “side processing” while writing to a file-like object. The processing is basically checksumming on-the-fly. I’m essentially doing something like:
what I’d like is to be able to also get the data read from source and use hashlib’s update mechanism to get a checksum of the object. The easiest way to do it would be using temporary storage (an actual file or a StringIO), but I’d prefer to avoid that since the files can be quite large. The second way to do it is to read the source twice. But since that may come from a network, it makes no sense to read it twice just to get the checksum. A third way would be to have destination be a file-like derivative that updates an internal hash with each read block from source, and then provides a way to retrieve the hash.
Instead of creating my own file-like where I’d mostly be “passing through” all the calls to the underlying destination object (which incidentally also writes to a network resource), I decided to use padme which already should do most of what I need. I just needed to unproxy a couple of methods, add a new method to retrieve the checksum at the end, and presto.
A first implementation looks like this:
#!/usr/bin/pythonfrom__future__importprint_functionimporturllib2asrequestlibimporthashlibimportpadmeclasssha256file(padme.proxy):@padme.unproxieddef__init__(self,*args,**kwargs):self.hash=hashlib.new('sha256')returnsuper(sha256file,self).__init__()@padme.unproxieddefwrite(self,data):self.hash.update(data)returnsuper(sha256file,self).write(data)@padme.unproxieddefgetsha256(self):returnself.hash.hexdigest()url="http://www.canonical.com"request=requestlib.Request(url)reader=requestlib.urlopen(request)withopen("output.html","wb")asdestfile:proxy_destfile=sha256file(destfile)forread_chunkinreader:proxy_destfile.write(read_chunk)print("SHA256 is {}".format(proxy_destfile.getsha256()))
This however doesn’t work for reasons I was unable to fathom on my own:
This is clearly because super(sha256file, self) refers to the *class* and I need the *instance* which is the one with the write method. So Zygmunt helped me get a working version ready:
#!/usr/bin/pythonfrom__future__importprint_functiontry:importurllib2asrequestlibexcept:fromurllibimportrequestasrequestlibimporthashlibimportpadmefrompadmeimport_loggerclassstateful_proxy(padme.proxy):@padme.unproxieddefadd_proxy_state(self,*names):""" make all of the names listed proxy state attributes """cls=type(self)cls.__unproxied__=set(cls.__unproxied__)cls.__unproxied__.update(names)cls.__unproxied__=frozenset(cls.__unproxied__)def__setattr__(self,name,value):cls=type(self)ifnamenotincls.__unproxied__:proxiee=cls.__proxiee___logger.debug("__setattr__ %r on proxiee (%r)",name,proxiee)setattr(proxiee,name,value)else:_logger.debug("__setattr__ %r on proxy itself",name)object.__setattr__(self,name,value)def__delattr__(self,name):cls=type(self)ifnamenotincls.__unproxied__:proxiee=type(self).__proxiee___logger.debug("__delattr__ %r on proxiee (%r)",name,proxiee)delattr(proxiee,name)else:_logger.debug("__delattr__ %r on proxy itself",name)object.__delattr__(self,name)classsha256file(stateful_proxy):@padme.unproxieddef__init__(self,*args,**kwargs):# Declare 'hash' as a state variable of the proxy itselfself.add_proxy_state('_hash')self._hash=hashlib.new('sha256')returnsuper(sha256file,self).__init__(*args,**kwargs)@padme.unproxieddefwrite(self,data):self._hash.update(data)returntype(self).__proxiee__.write(data)@padme.unproxieddefgetsha256(self):returnself._hash.hexdigest()url="http://www.canonical.com"request=requestlib.Request(url)reader=requestlib.urlopen(request)withopen("output.html","wb")asdestfile:proxy_destfile=sha256file(destfile)forread_chunkinreader:proxy_destfile.write(read_chunk)print("SHA256 is {}".format(proxy_destfile.getsha256()))
here’s the explanation of what was wrong:
– first of all the exception tells you that the super-object (which is a relative of base_proxy) has no write method. This is correct. A proxy is not a subclass of the proxied object’s class (some classes cannot be subclasses). The solution is to call the real write method. This can be accomplished with type(self).\__proxiee__.write()
– second of all we need to be able to hold state, namely the hash attribute (I’ve renamed it to _hash but it’s irrelevant to the problem at hand). Proxy objects can store state, it’s just not terribly easy to do. The proxied object (here a file) may or may not be able to store state (here it cannot). The solution is to make it possible to access some of the state via standard means. The new (small) satateful_proxy class implements __setattr__ and __delattr__ in the same way __getattribute__ was always implemented. That is, those methods look at the __unproxied__ set to know if access should be routed to the original or to the proxy.
– the last problem is that __unproxied__ is only collected by the proxy_meta meta-class. It’s extremely hard to change that meta-class (because padme.proxy is not the real class that you ever use, it’s all a big fake to make proxy() both a function-like and class-like object.)
The really cool thing about all this is not so much that my code is now working, but that those ideas and features will make it into an upcoming version of Padme 🙂 So down the line the code should become a bit simpler.
One of lxc’s nice time-saving features is that, after initial container creation, it will cache the files it downloaded to do so, and when you create a new container using the same template/version/architecture, it will leverage the existing files and create the container with minimal downloads and really quickly.
A downside of this is that the cache can become stale; this is apparent when you want to install a package in a container and apt-get gives 404 errors indicating the version of the package the container knows about, is no longer available in the archive (most likely superseded by a new one).
This is easily fixed by always doing apt-get update in the container prior to any package installs/upgrades. However, it’s cumbersome, and if you’re creating dozens of new containers every day, the bandwidth and time spent re-downloading can quickly add up.
To update the “base image” or cache, which resides in /var/cache/lxc for each version, you can do two things.
most templates also support --flush-cache so if you’re calling lxc-create directly, just add an extra --flush-cache as template args (after --) and the cache will be flushed before making the container. Something like
Sometimes you may want to configure a wireless interface on a system with Ubuntu Server. The most common use case (for me, at least) is to run some tests with server, which require two network interfaces, on a laptop (it’s what I have available to play with) with an ethernet interface and a wireless interface. As long as Ubuntu sees the wireless interface, it’s quite easy to set things up so the wireless comes up at boot time.
You will probably need to set up the server to forward and masquerade the internal network (usually, the ethernet segment is the internal one, while the wireless counts as the “outside” interface). There are plenty of tutorials to do this over the internet, so I won’t extend this post by detailing that.
Of course, the wireless will grab a dynamic IP address, so use caution with that as the address may change (or, assign a static one from your router’s unused range). Anyway. Put this in /etc/network/interfaces:
# This file describes the network interfaces available on your system# and how to activate them. For more information, see interfaces(5).# The loopback network interfaceauto lo
iface lo inet loopback
auto eth0
iface eth0 inet static
address 10.10.10.1
netmask 255.255.255.0
auto wlan0
iface wlan0 inet dhcp
wpa-ssid your-network-ssid
wpa-ap-scan 1wpa-proto RSN
wpa-pairwise CCMP
wpa-group CCMP
wpa-key-mgmt WPA-PSK
wpa-psk your-network-password
Then you can do ifup wlan0 to bring the interface up. It should also come up automagically at boot time.
This was used to resync a file whose audio was consistently 1.75 seconds behind the video track. The resulting file also contains the first 2 subtitle tracks from the original file.
As part of the team that maintains several testing tools for Ubuntu, including checkbox, I sometimes find myself needing to build .deb packages from our source tree.
'building stuff is hard'
A simple way of achieving this is of course to run dpkg-buildpackage or even bzr-buildpackage. Assuming all build-deps are correctly installed in the host system, this will result in a nicely built set of .debs.
This approach has a few caveats, in that it’s different from the build process actually employed to create the packages that ultimately get uploaded to Ubuntu (or even the ones available in Launchpad PPAs).
The two main differences are that Launchpad builds the packages in a “clean” environment, installing build-deps from scratch, whereas dpkg-buildpackage will rely on what’s installed in the system. So if you miss specifying a build-dep, your local build may work because you have it installed, but the PPA build will fail because it will not be present.
The second big difference is that with the local approach, you’re “limited” to building packages for the “host” system. Sure, you can specify a different target release in your debian/changelog file, but some aspect of your build may be tied to your system’s tools, versions and layout, and if for some reason they don’t match the actual target at installation time, things will fail in interesting ways.
Clearly, one way to test what the Launchpad build process will spit out is to build a source package and dput that to be built directly on a PPA. The problem here is that the feedback loop becomes excruciatingly slow; PPAs are a shared resource and build times can go from minutes to many hours.
Based on all this, it makes sense to try to use a local build environment that more closely replicates what PPAs do to build your packages.
Fortunately, the PPA builders use free software, so it’s relatively easy to do local builds in a similar environment, completing quickly due to use of local resources, and only upload to Launchpad once you’re pretty sure your build will succeed.
The software in question is sbuild, and I already wrote a post detailing how to install sbuild and set up a build environment for any Ubuntu release you need.
This setup worked fine for the occasional package build when you know packaging is mostly correct. For a fast build such as checkbox, setting up the build environment with all needed packages and build-deps takes about 10 minutes (depending mostly on download speed for all the packages). Of course on a more complex package, compilation time may start to be a factor.
Anyway, the 10-minute time can be too slow if you’re trying to fix a tricky problem and need a fast feedback loop. Plus the process produces a lot of transient files and downloads a set of packages many times, so there’s plenty of room for improvement here.
A large part of the time spent doing the “local” part of the process is writing files to disk. One way to speed this up is to use a ramdisk to store the build. I’m too lazy and have too little RAM to use this approach, so the alternative was setting up eatmydata inside the chroot. Since these are mostly temporary files or throwaway packages, it’s OK to lose the safety of constant syncs in exchange for a huge boost in speed.
The setup for eatmydata inside the chroot is described here. This looks a bit hard to automate, but luckily we don’t have to, as recent versions of mk-sbuild simply support a –eatmydata parameter, if given this will install eatmydata inside the chroot and do the choot config file change to enable eatmydata.
Adding PPA
You can add a custom PPA to an image. Once the chroot image is built, enter the “golden master”:
sudo schroot -c source:saucy-amd64 -u root
You can add a deb line (get it from launchpad) to your sources:
cat >>/etc/apt/sources.list.d/something.list
 # Copy line here
Then you need to get the GPG key for the PPA and add it manually with the very basic tools provided in the chroot (sorry, no apt-add-repository):
apt-key add -
# Paste GPG armored key here
Then exit the golden image. After this, your builds from this chroot will be able to fetch packages from the PPA.
Again, that’s a bit of work to do for each VM. Instead, what I did was create a file in /etc/schroot/setup.d to do this automatically. You can of course replace the PPAs you need in the echo lines at the end. Name the file something like 81add-ppas:
Notice that again, I was very lazy and instead of downloading the gpg keys as shown above (as for some reason trying to run gpg from the setup script didn’t work), I just configured apt to allow unauthenticated packages. Since this sbuild is mainly for testing purposes it’s not a big deal to skip this verification step. Also, there’s some logic to automatically detect the chroot release, so the same config file works equally well for any Ubuntu release.
Apt-cacher-ng
As the name suggests, this nifty utility will cache packages so the next time you need them they’ll be fetched from local storage rather than from the network. A bit of config is needed to have sbuild download packages from here.
First, install apt-cacher-ng on the host system. You can verify it’s listening on port 3142 by any means you like.
Then, to set it up automatically in chroots, add this to the host system’s /etc/schroot/setup.d/80apt-cacher-ng (rather, create that file; it doesn’t exist by default):
#!/bin/sh
 set -e
 . "$SETUP_DATA_DIR/common-data"
 . "$SETUP_DATA_DIR/common-functions"
 . "$SETUP_DATA_DIR/common-config"
 if [ $STAGE = "setup-start" ] || [ $STAGE = "setup-recover" ]; then
 echo "# Added by the schroot setup mechanism (roadmr)" > "${CHROOT_PATH}/etc/apt/apt.conf.d/80proxy"
 echo "Acquire::http::Proxy \"http://127.0.0.1:3142\";" >> "${CHROOT_PATH}/etc/apt/apt.conf.d/80proxy"
fi
With these two setup.d scripts and the –eatmydata magic, it’s easy to create sbuild environments which will be much faster when building packages.
As a comparison, building msmtp (chosen because this tests mainly the speedup components, not needing any packages from a PPA) takes about 40 seconds with these suggested tweaks:
It looks like they’re about 3 times faster, but that’s misleading because I deliberately chose a small, quick-to-compile package. Still, you can at least reduce network and disk access very easily now. Note, also, that my test system has a fast SSD. Speedup on a traditional rotary magnetic hard-disk is likely to be much higher.
In late 2010, as I was starting a new job, I bought a new laptop, a Samsung QX410, based largely on this review.
From the beginning I was quite happy with that laptop: the screen is decent, the keyboard spacious and comfortable, battery life is OK, and in retrospective it’s a solidly-built laptop that stood up to 2.5 years of heavy daily use.
However, eventually the time came for it to die, so in late 2013 I had to start looking for replacements. Since I still needed to work, I borrowed a Lenovo Thinkpad T520 to use temporarily. Spec-wise it was similar to the Samsung, save for the larger 15″ screen and the thing that really spoiled me, the excellent Lenovo laptop keyboard. Alas, this appears to have been lost in the latest generation; I had a chance to try a Thinkpad X240 (one of the candidates for replacing the Samsung) and found the island-style keyboard odd and uncomfortable.
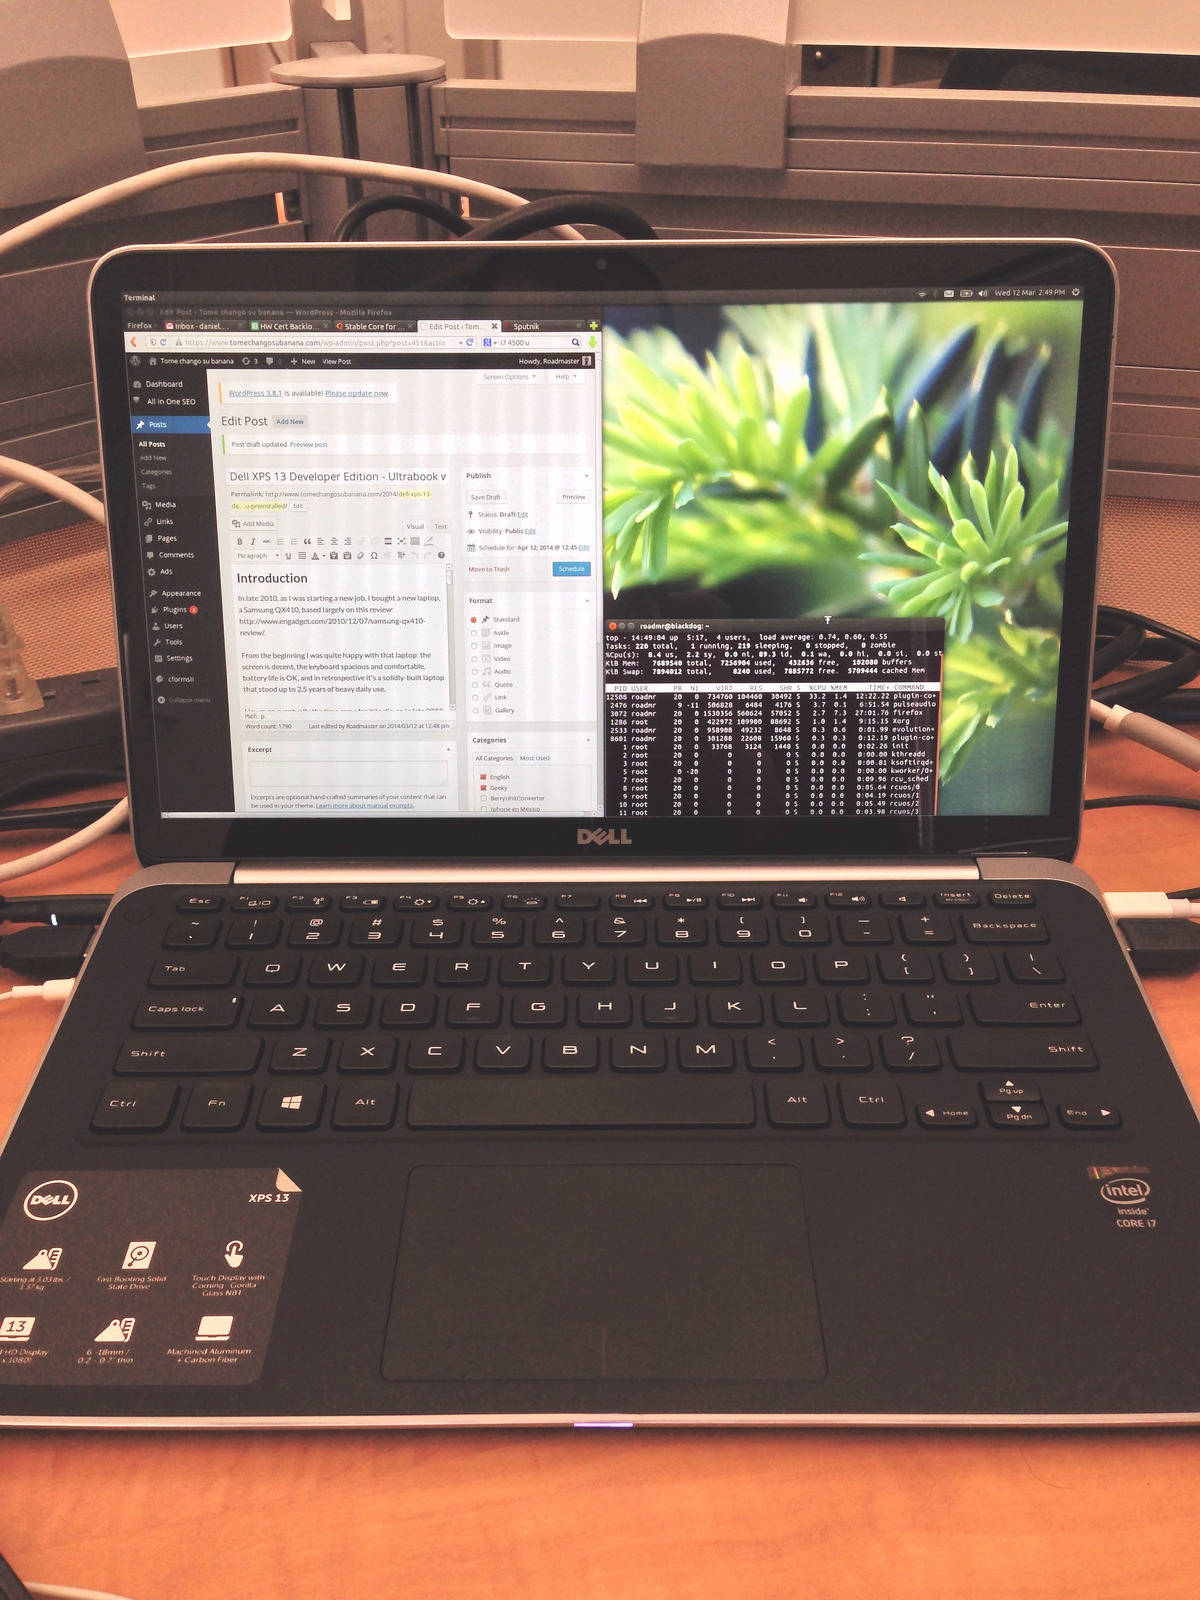
At the same time I was able to use a Dell XPS 13 for a few days, and the keyboard on that little machine felt extremely comfortable and close to the Samsung’s (which I’m already used to). So the XPS 13 immediately moved to the top of the list. In early 2014 I finally pulled the trigger and got the Developer Edition XPS 13. The Developer Edition is the result of the “Sputnik Project” and has been available for all previous XPS 13 generations. Here are my impressions of it.
The XPS 13 is somewhat of a MacBook Air lookalike with the same slim wedgy shape. While the footprint is a bit smaller than the 13-inch Air, they look very similar from a top view. The XPS’s top lid and frame are machined aluminum, though the similarity ends there, as the keyboard and deck are coated with black soft-touch rubber, and the bottom is black carbon fiber. The XPS is different enough to qualify as “inspired by”, rather than “knockoff of”.
Incidentally, the MacBook air was also on my list of candidate laptops. The XPS 13 beat it for a couple of reasons. The screen is higher-resolution and touch-enabled, it’s Ubuntu-certified and available with Ubuntu preinstalled, and it has a PC keyboard. Apple keyboards are great but I just can’t get used to the ctrl-alt-cmd layout and always keep hitting the wrong keys. Also, for a comparable configuration, cost was similar. So in the end the XPS 13 won.
Chassis
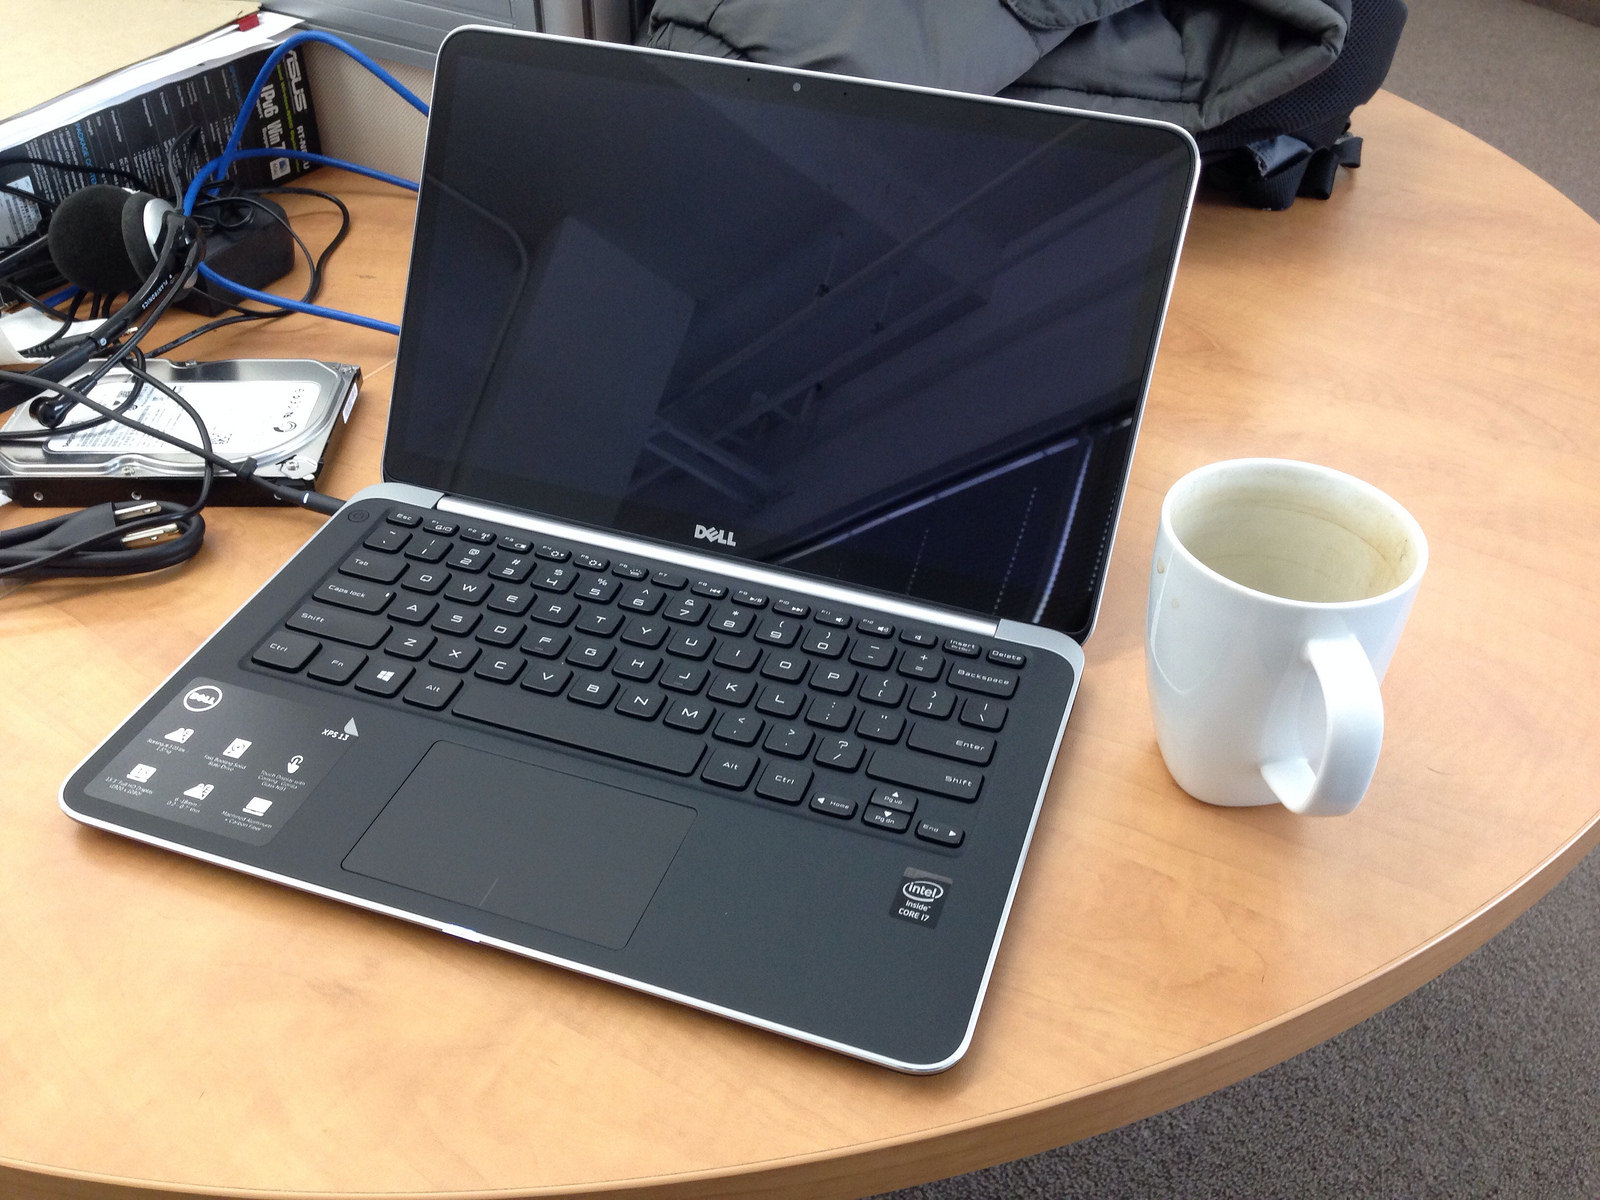
The XPS 13 is really thin, as befits a 13-inch ultrabook, and has the typical front taper to a 6-mm thinness.
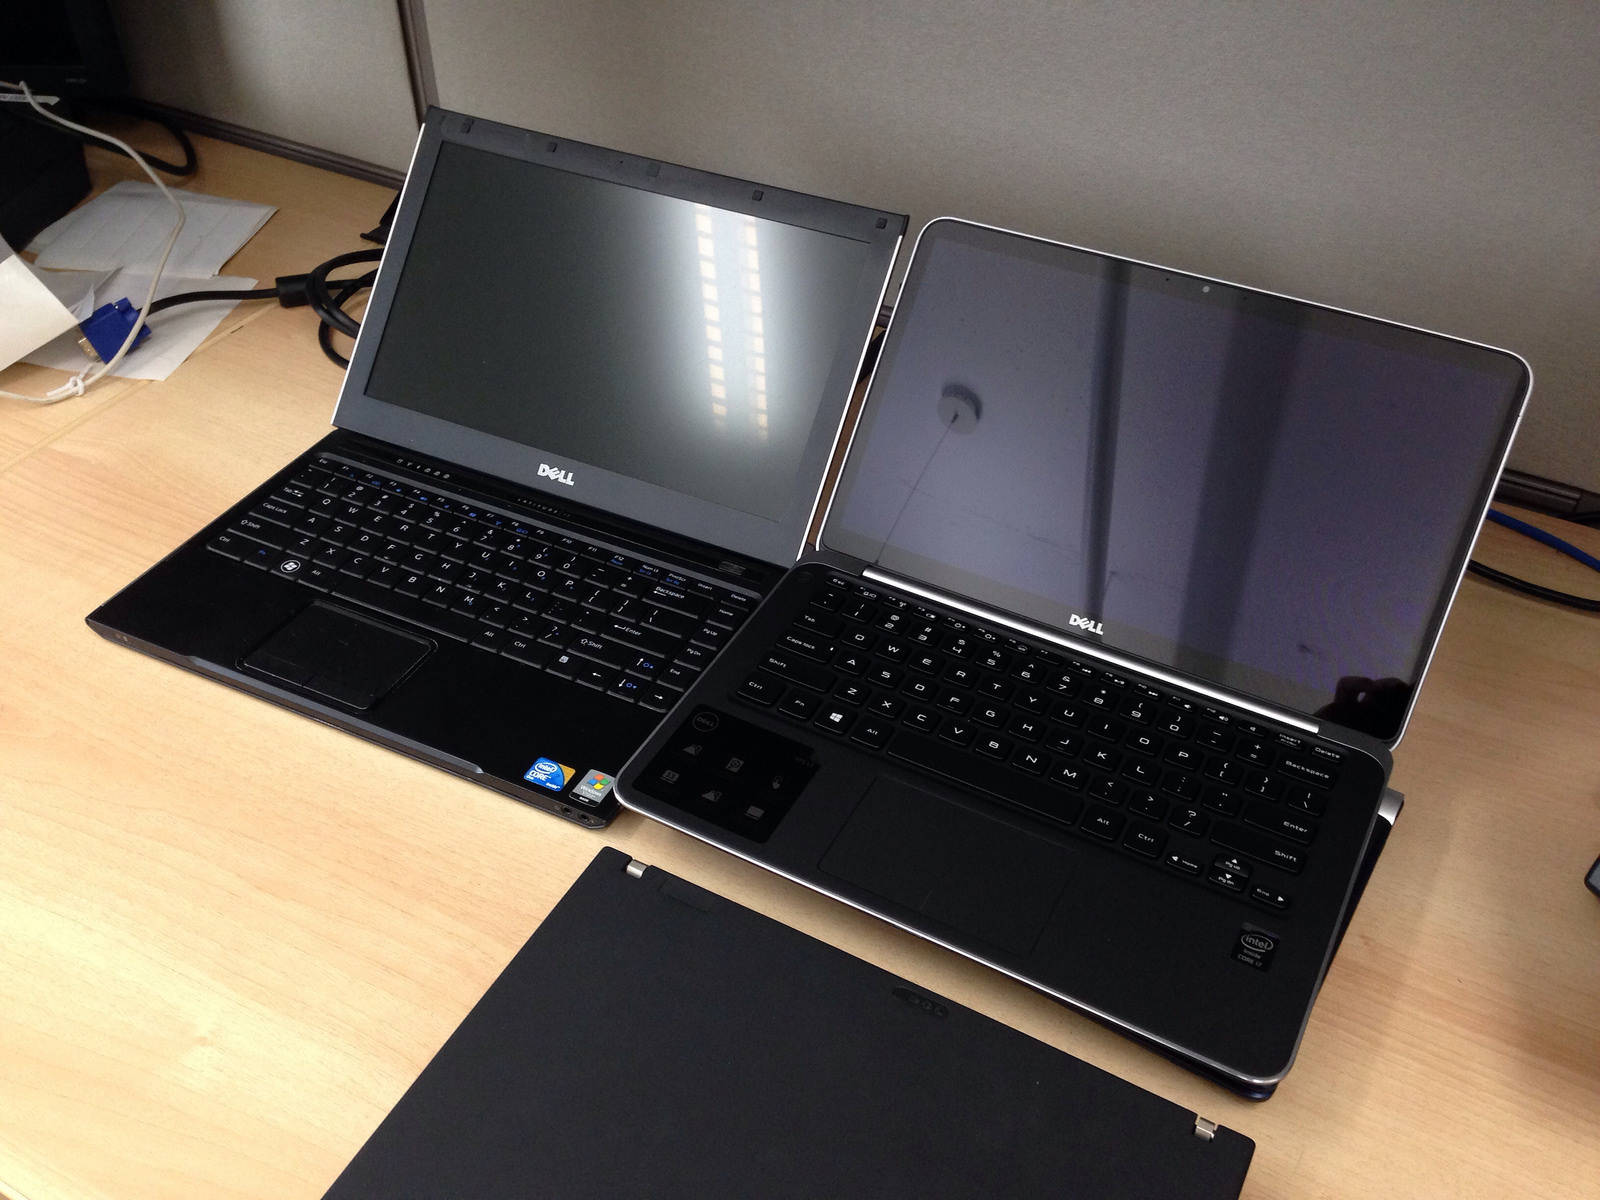
The thing weighs about 1.4 kg. Since it’s so tiny it actually feels heavy for the size, but it’s by no means heavy. Carry it in a backpack and you’ll barely feel it’s there. Quite a difference from the 2.25-kg Samsung and the 2.5-kg Thinkpad T520, which looks and feels like a behemoth next to the XPS (A nostalgia shot of those laptops next to the XPS is at the end of this post).
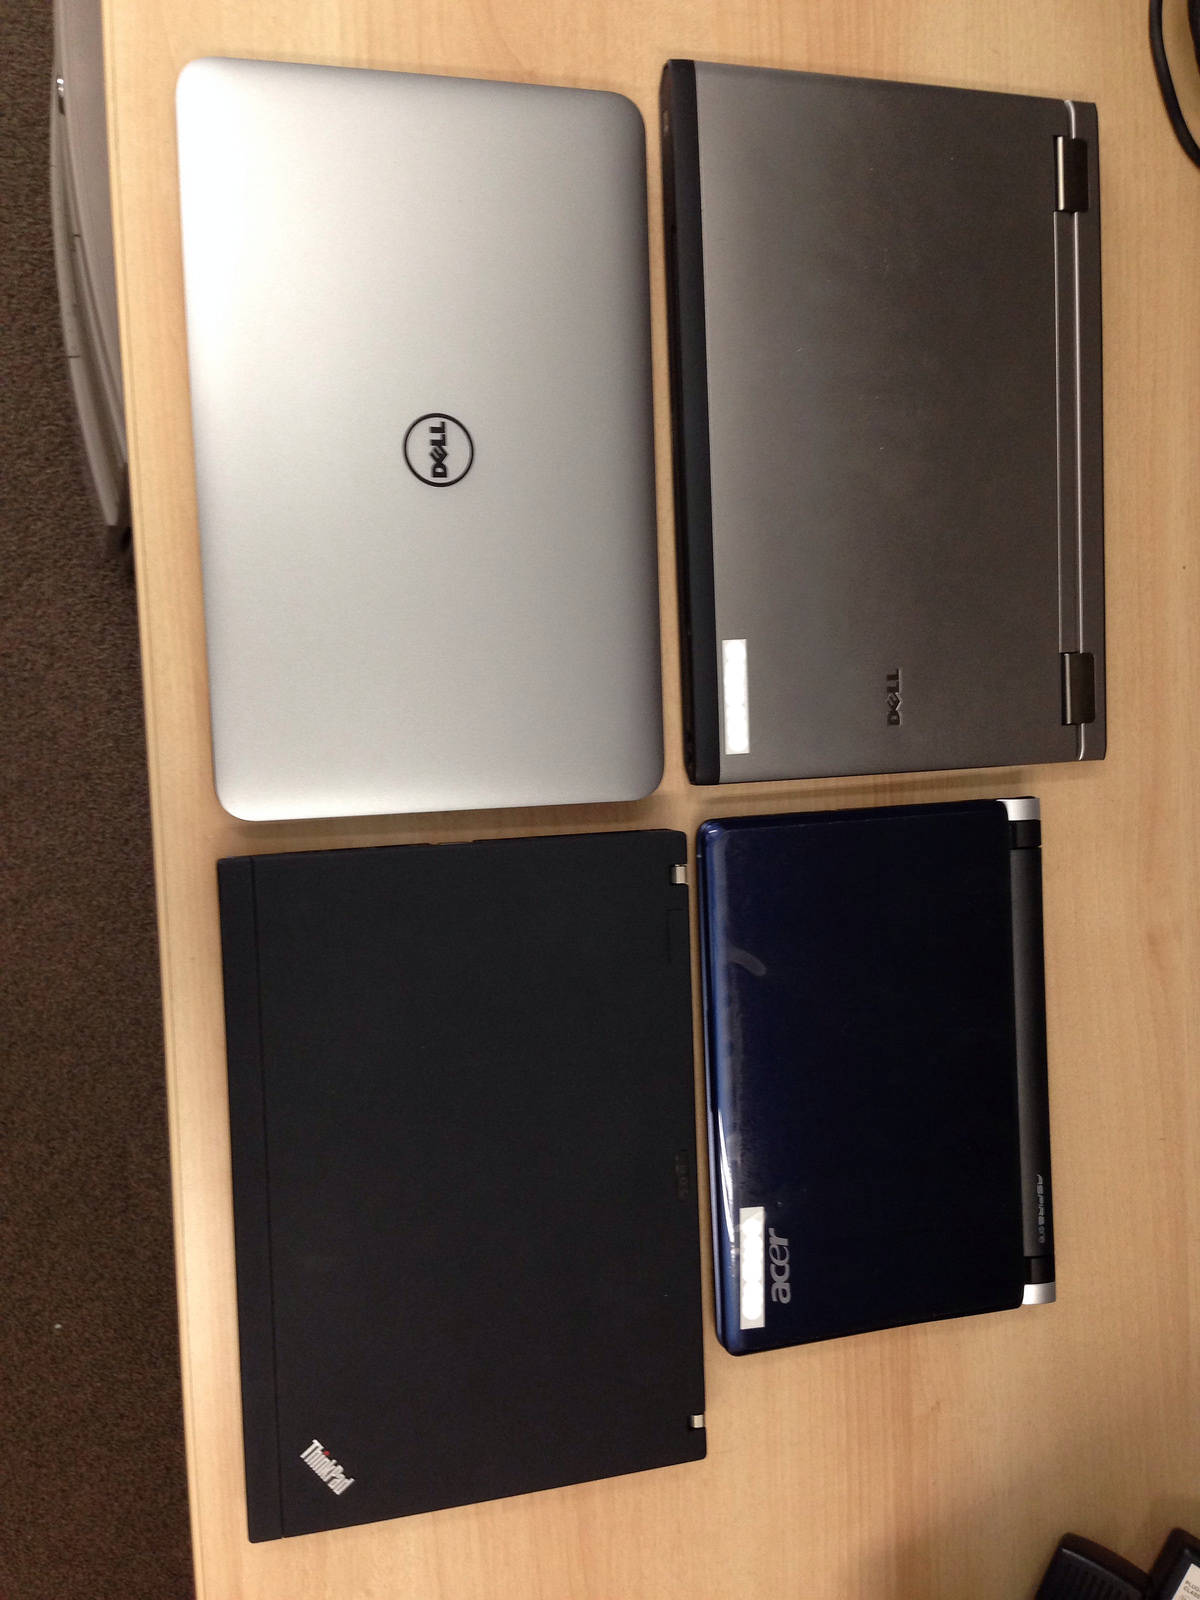
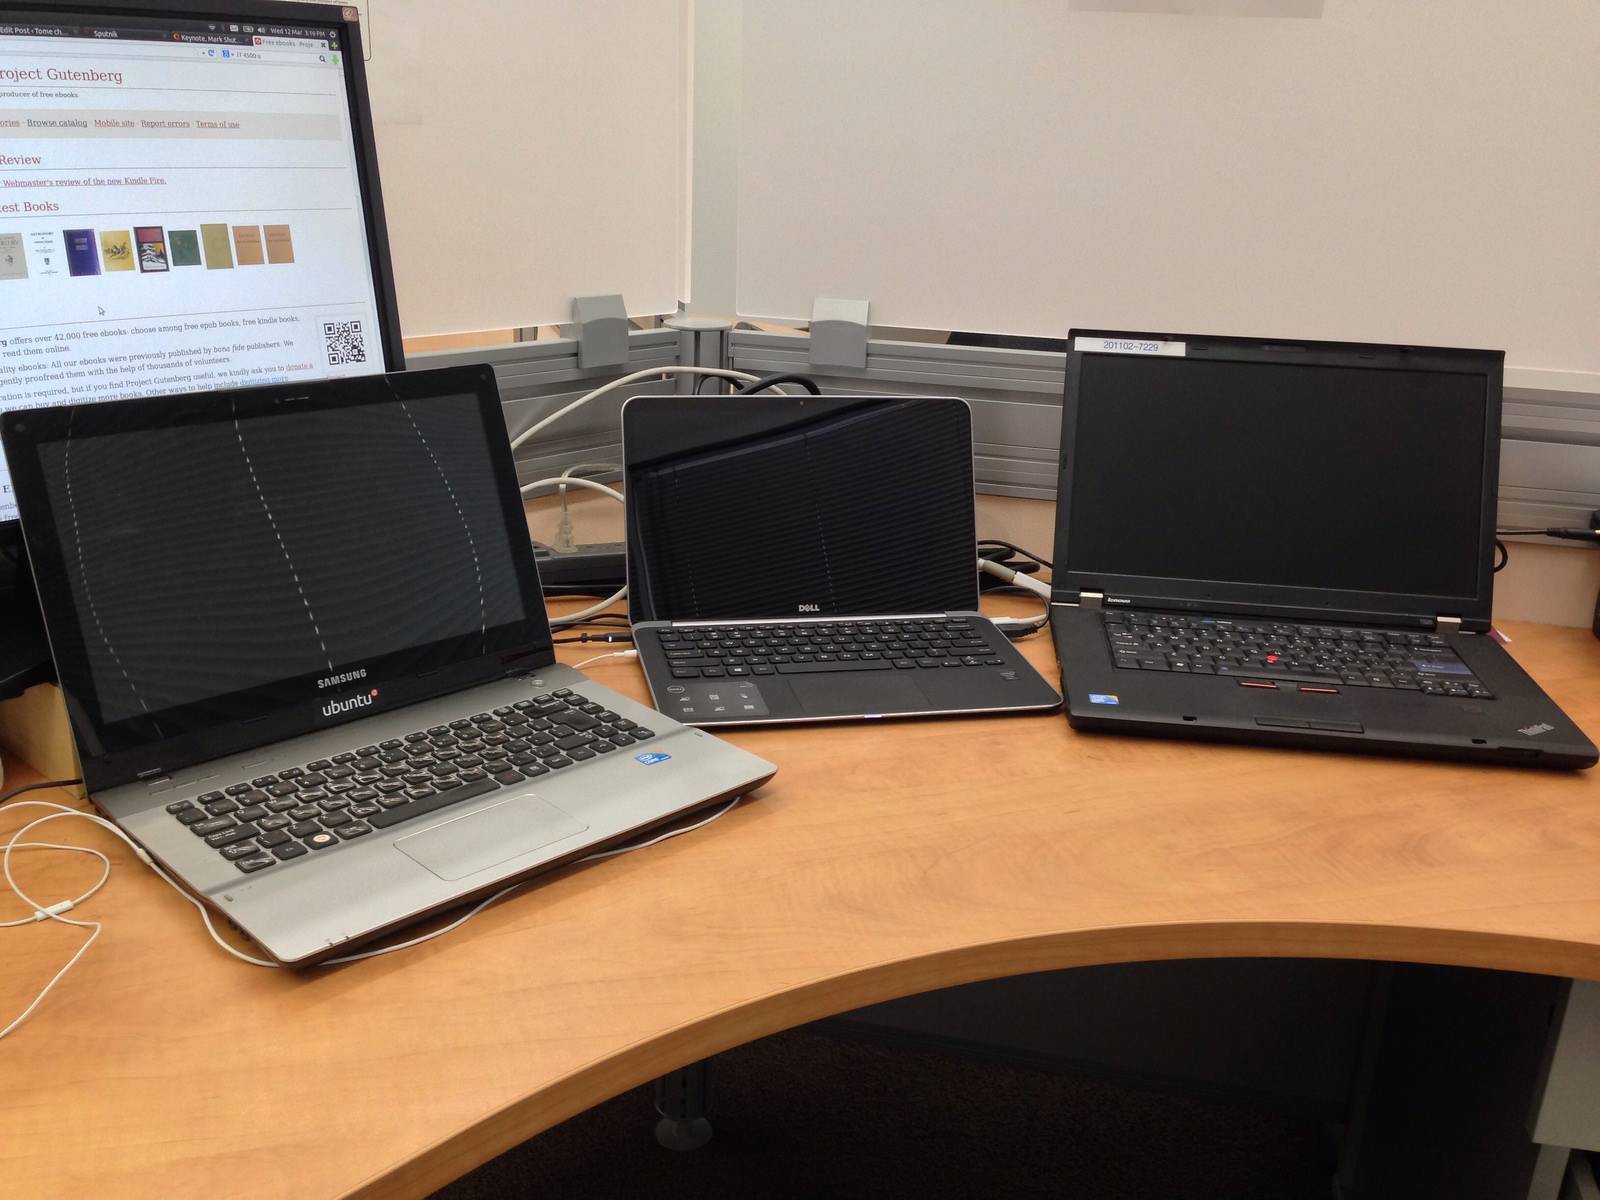
To give an idea of the XPS’s dimensions I made a quick photo shoot next to some comparable pre-ultrabook ultraportables.
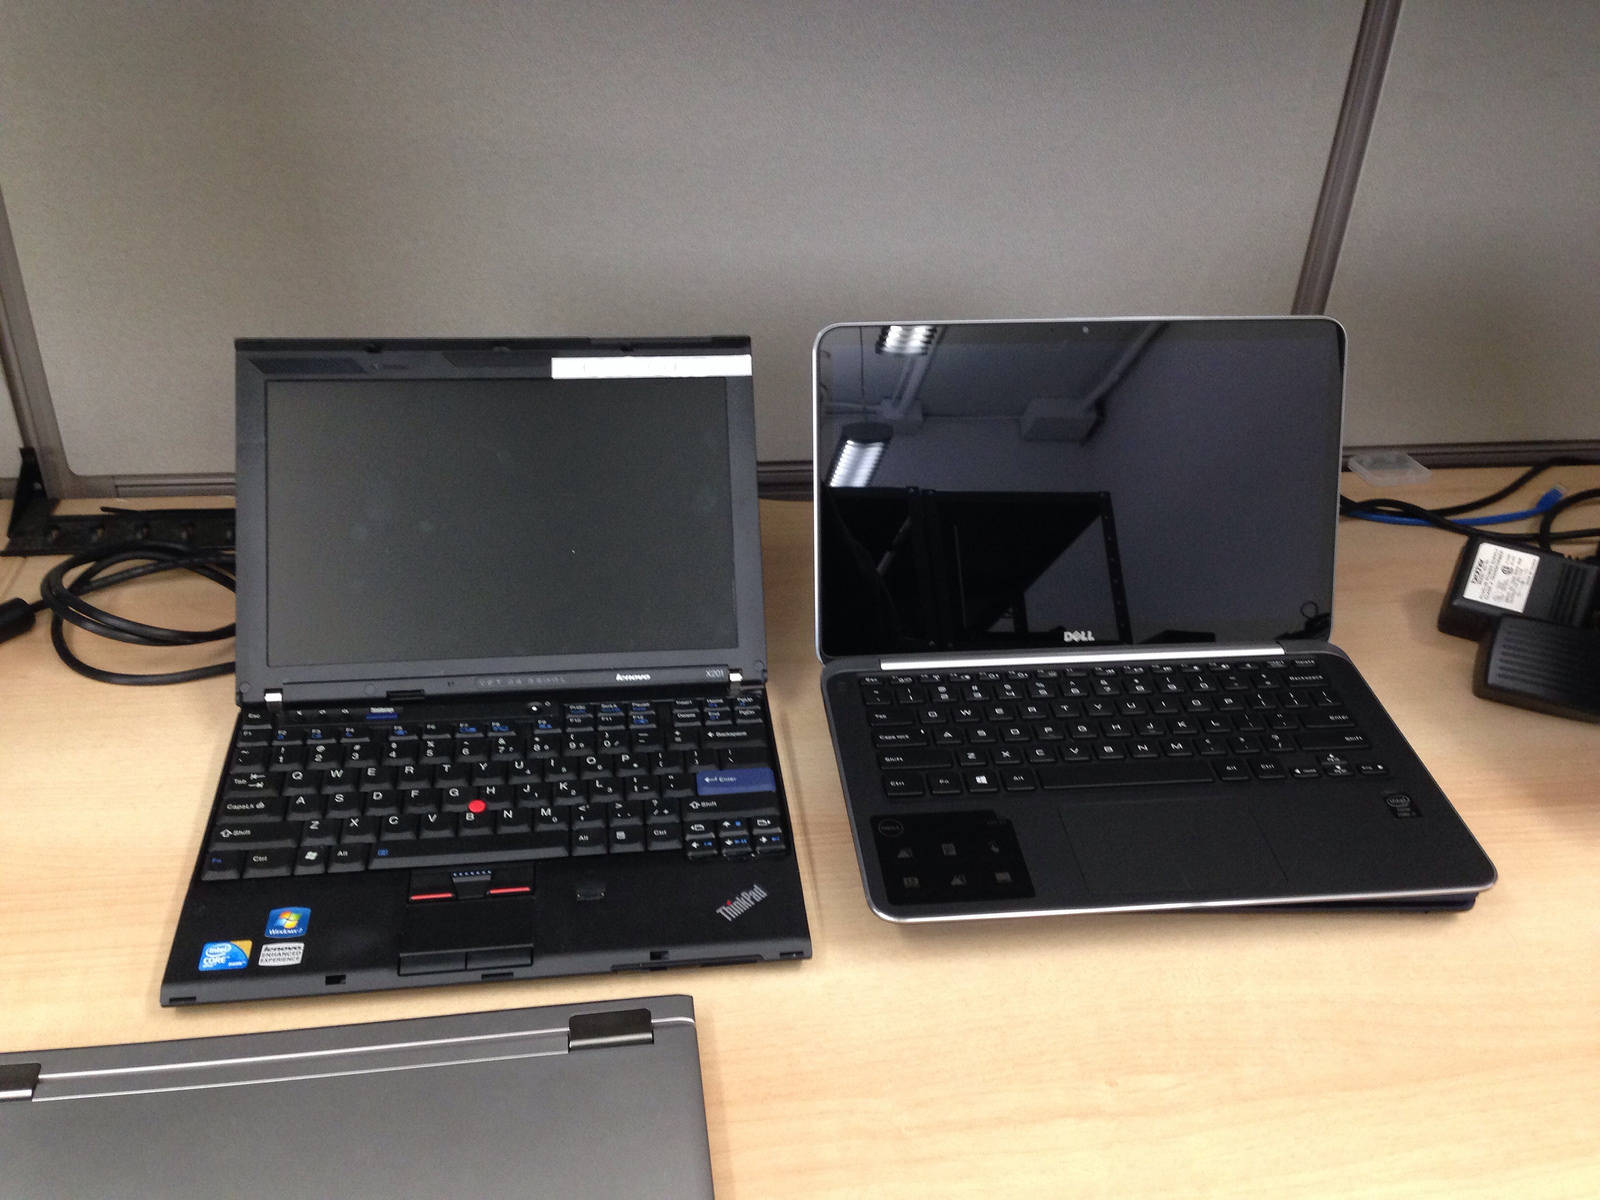
Top row shows a Dell Vostro V13 and an Acer Aspire One netbook (11″ screen). Bottom row includes the XPS 13 and the legendary Thinkpad X201 with 12″ screen. Despite having a 13″ screen, the XPS is smaller than the Thinkpad X201 and the V13. Footprint-wise, the screen is the limiting factor, so for a 13″-class system it’s reasonable to not see a huge difference.
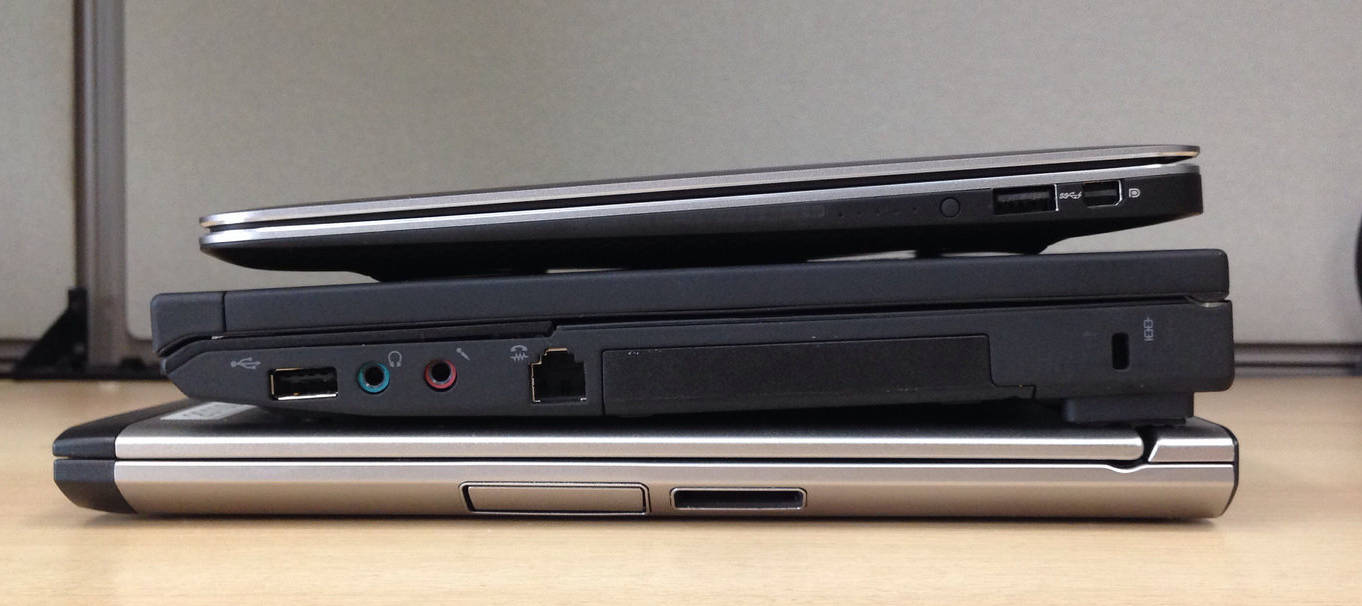
The side view is where the XPS 13’s thinness becomes evident. The XPS 13 is on top, above the X201 and with the V13 at the very bottom.
The V13 was a tremendously thin machine for its generation, which shows in the fact that it’s almost as thin as the XPS 13’s rear. Of course, the XPS 13’s taper at the front is goes on to be about as thin as the V13’s screen. The V13 made performance compromises to fit in such a svelte chassis, but in all honesty the XPS 13 is also not a speed demon and also has fewer ports and expandability than other bulkier options.
The X201 isn’t even in the same league here; comparing the thickest parts (rear end) it’s almost 3 times thicker than the XPS 13. The X201 is still quite light, about 200g heavier than the X13, the chassis is incredibly sturdy (XPS 13 doesn’t feel flimsy at all but I’d hesitate to put it through the kind of abuse a Thinkpad is known to just shrug off), and it has a lot more expandability, in the form of more USB ports, an expresscard slot, a media card reader, ethernet and modem ports, and incredibly, a full VGA connector.
By comparison and list of ports, the XPS 13 only has a combo audio jack, 2 USB 3.0 ports, and a mini-DP port for external video. This is the price one pays for ultraportability…
In the following paragraphs I posted pictures of the XPS 13, open, next to the V13 and the X201. The keyboard looks minimalistic in comparison but it’s quite comfortable to use. The V13’s is not as nice, while the X201 has that fantastic Lenovo keyboard.
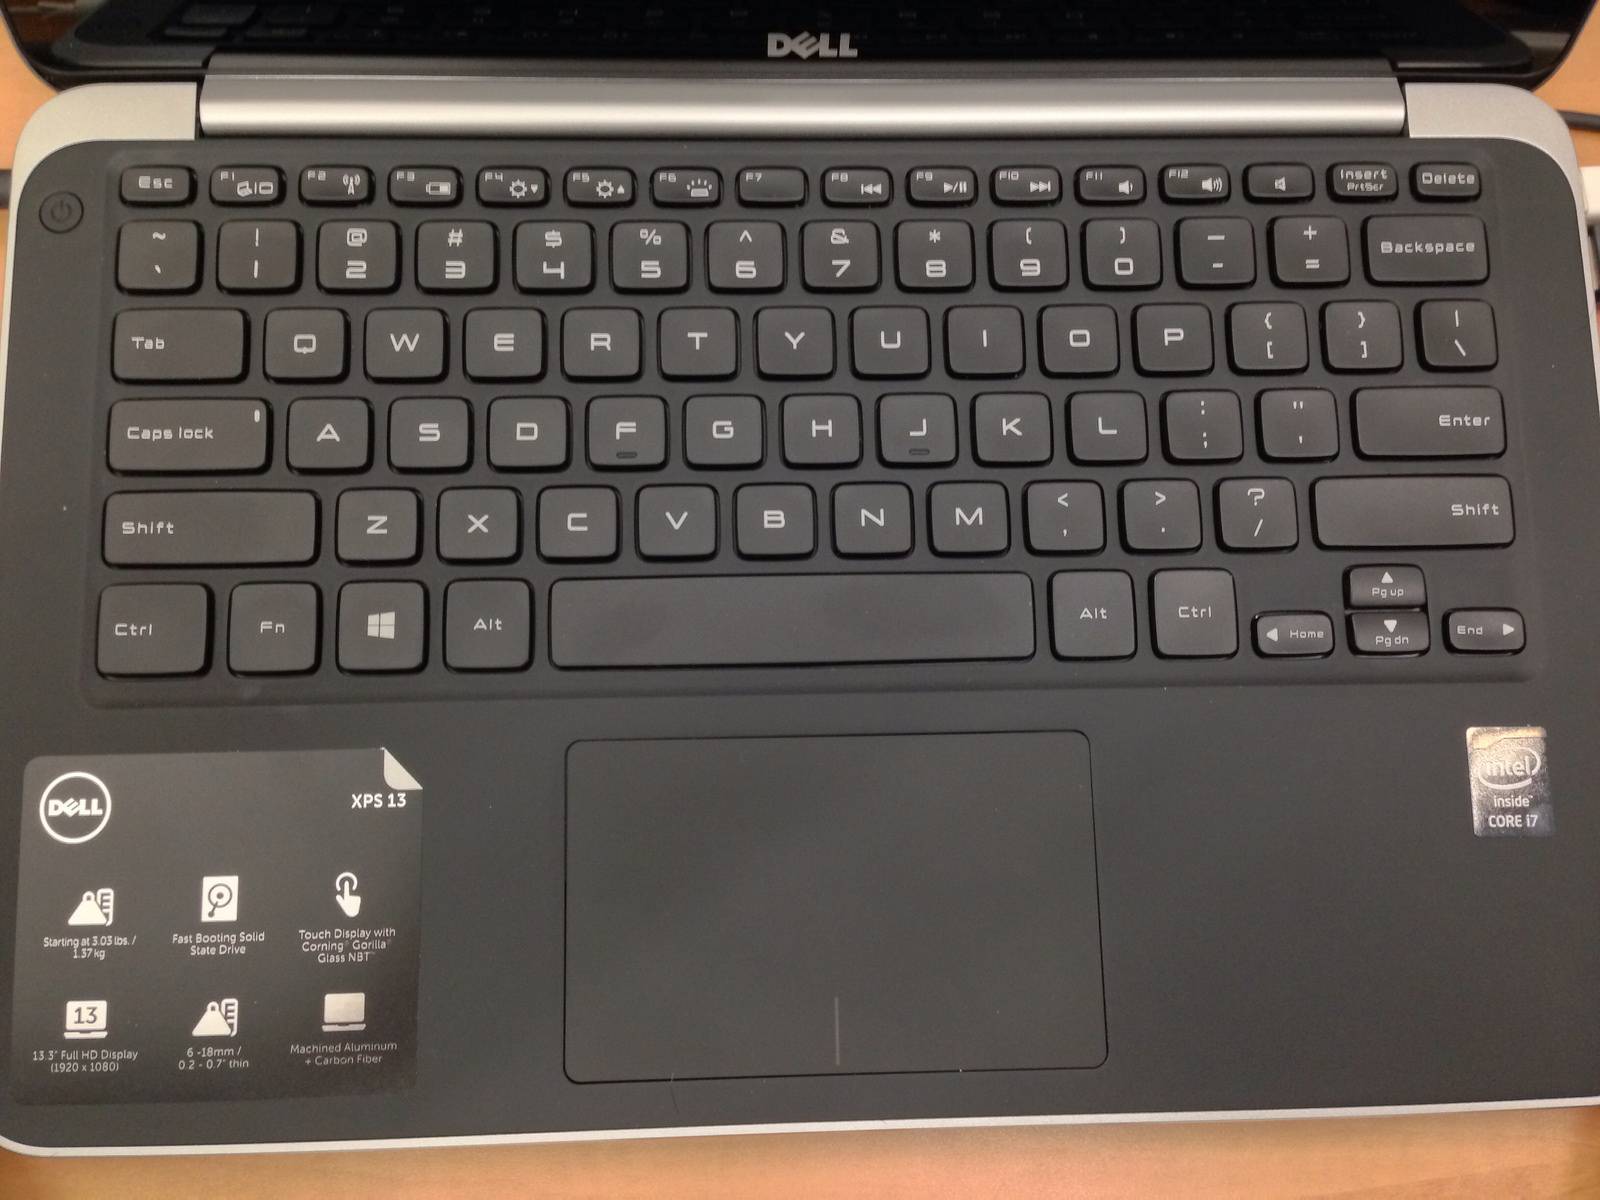
Keyboard and touchpad
The XPS 13’s keyboard has no extraneous dedicated keys, other than the power and mute buttons; everything else is handled by the standard keys, with F-keys doubling as special-function keys to switch monitors, control wireless, show battery information, control volume and brightness as well as keyboard backlight, and perform media control functions.
All standard keys are standard-sized and in their proper positions. Exceptions are the half-size F-keys, including insert and delete, and the cursor keys. One thing I don’t like is lack of dedicated page-up and page-down keys; these are handled (along with home and end) by the cursor keys in combination with Fn. I use pg-up and pg-down extensively to switch tabs in Firefox and this is really a sore point for me. But that’s about the only tradeoff this excellent keyboard makes.
The touchpad seems to be a synaptics model, one of those “buttonless” trackpads, although it does have distinct clicklable sections at the bottom. Unlike the Samsung’s touchpad which was very troublesome and only worked in tap-to-click mode, this touchpad’s clickable buttons also work perfectly, so you’re free to click or two-finger-tap anywhere, or use the “discrete” buttons if you like, which makes things like dragging much easier.
A backlit keyboard is nice to have, but when the light is on, an annoying high-pitched whine comes from underneath the keyboard. This problem has been reported to Dell by many users and is still awaiting a fix or response. As a result, I usually keep the backlight off.
Screen
Both the laptops I’ve been using lately had non-IPS panels with industry-standard resolutions for the time. 1366×768 for the Samsung is pretty typical. One gripe I had is that the Samsung’s screen was “protected” by a glossy sheet of cheap plastic that with time became very scratched and made the screen harder to see. This can be seen in the picture at the end of this post.
The XPS 13’s screen is stunning by comparison, if only because it’s a much newer panel. Viewing angles are amazing, the 1920×1080 resolution is razor-sharp and crisp (and even a bit too high for the screen size), and the backlight is strong enough to overcome the gorilla glass cover’s gloss. At least I expect it won’t get scratched easily. This is a Synaptics touchscreen which has worked very well with Ubuntu, although I haven’t used it all that much because it feels very alien to my workflow.
Performance and battery life
I’m ill-equipped to provide an assessment here, as the jump from the pre-Sandy Bridge Samsung to the Haswell XPS 13 (plus a bump from i5 to i7 CPU) is so enormous that this machine just feels like it flies. One thing worth mentioning is that, while the Samsung had a standard mobile CPU (i5 480M with 3M cache and 35W TDP), the XPS 13 has the aforementioned, newer i7 with 4 MB cache, but in a low-TDP (only 15W), ULV variant. So by its ultraportable nature it’s on the lower side of the specs spectrum, however the generational advantage plus i7-ness really do make a difference and the system is snappy at all times.
Perhaps the biggest leap forward is the LiteOn SSD. While not hooked up directly to PCIe like a MacBook’s, this mSATA drive is absurdly fast in comparison to what I’d been using, resulting in a 3-second boot time (even with disk encryption), way faster than the 20-30 seconds I was getting on the Samsung.
Under moderate load (a few terminal windows open where I’m typing stuff, plus a browser with a some tabs, one of which is playing a Youtube video), the XPS 13 reports a battery lifetime of about 6 hours. For comparison, the Samsung lasted about 3 hours with a comparable workload on a 66Wh battery.
Given a mostly-idle workload (browser with static content plus a few terminal windows), the XPS 13 reports about 8 hours of battery life.
Software
Perhaps the nicest thing about the XPS 13 is that it’s certified for Ubuntu, and the Developer Edition I got comes preinstalled with Ubuntu 12.04, augmented by some OEM-specific tweaks to ensure all the hardware works correctly. Indeed everything works out of the box, and the first-boot experience is very smooth and polished, definitely less cumbersome than booting a Windows machine for the first time.
In case it’s needed, a utility to create a recovery disk is provided. I created a USB stick which can be used to quickly restore the machine to factory status. I then proceeded to erase the preinstalled Ubuntu version and install the latest development release (which will be released as Ubuntu 14.04). Don’t get me wrong, the preinstall is perfectly usable for 99% of people as it has a typical Ubuntu installation with all the usual tools, receives security and browser upgrades until 2017, and even includes a plethora of cloud software development tools such as Juju and Virtualbox (this is why it’s called a “Developer edition” and is focused on cloud development). However, because of my work, I really wanted to have the newest possible Ubuntu version. An ulterior motive was to verify whether the OEM-specific tweaks in the preinstalled version were “upstreamed” and made available in subsequent Ubuntu versions. This is a policy for the Ubuntu certification program; whenever possible, the work done when enabling a new machine is made available in the following stock Ubuntu release.
With a couple of exceptions, everything continued to work just as it did with the preinstalled version, and I was able to recreate a working environment complete with a transfer of my backup in only a few minutes. The fast SSD and USB3.0 transfers from my backup drive are partly to thank for this.
As exceptions, the touchpad didn’t get recognized and required blacklisting an i2c-hid module; and I lost the media control keys (which I seldom use, so I haven’t bothered to re-enable them).
This makes it a great alternative for regions where the Developer Edition is unavailable; just procure the Windows version of this laptop and installing the latest Ubuntu will result in a working system.
Here’s a quick overview of the things I didn’t like about the XPS 13. Of course, none of them were deal-breakers for me, but I wanted to sum them up to highlight the fact that yes, it’s not a perfect machine.
Whining electrical noise (a defect, so once Dell confirms this is fixable I’ll apply for warranty service).
Lack of dedicated pgup/pgdn keys.
Screen a bit too glossy.
a dearth of ports.
Screen resolution too high for my poor, tired eyes (I’m half-kidding with this one).
To sum up, despite the above, I very highly recommend the XPS 13 Developer Edition. In addition to the sleek and solid hardware, you get Ubuntu preinstalled which will cover 99% of people’s needs, a system which benefits from the upstreamed enablement work resulting in an excellent platform to run the latest Ubuntu, *and* you send the message that Ubuntu preinstalls are desired by users, all while freeing yourself from the Microsoft tax which has plagued Linux laptop users for so long.
You’re probably familiar with whatismyip services. One problem with these is that they wrap the IP data in a visually-pleasing but impossible to parse smorgasboard of HTML.
I needed to determine external IP for a text-only host with somewhat limited tools, and I came across the wonderful ifconfig.me page. This basically does the same as whatismyip but with lightweight and easily parsable output. This, for instance, returns *only* the system’s external or public IP address:
curl http://ifconfig.me/ip
Several endpoints are provided for you to poke at your connection’s externally-visible information. For the ultimate in parsability and machine-readability, a complete json dump is provided here: http://ifconfig.me/all.json.
Recently I’ve had better success with http://ifconfig.co which works mostly similarly to ifconfig.me but is a bit faster.
A very interesting conversation erupted today, beginning when a coworker sent a lengthy email stating his reasons for altogether leaving Ubuntu 11.04’s new Unity desktop interface and instead resorting to the good, old-fashioned Gnome 2 “Classic” session.
In it he makes some very valid points about functionality that’s different to what he was used to. This understandably affects his workflow, so instead of wrestling with a new interface, he chose to go with the old one, hopefully until Unity matures enough for him to be able to customize it to his liking.
What’s interesting was the amount of responses it got, where everyone spoke about their “pet peeves” with Unity. The vast majority were changes in how Unity handles things, that interfered with people’s workflows. It’s understandable that even a small change in how your user interface behaves, when you’ve become adept at working with it, disrupts things enough (and annoyingly enough) that you either go back to the old user interface, or just start fiddling with the new one until you find a way to get things to an acceptable state.
Which is what struck me as curious about this thread: there were basically two camps, those who flat out abandoned Unity for the time being, and those who actually went looking into how Unity behaves and integrates with the environment, and came up with ways to make Unity more comfortable to those used to the “old ways” of Gnome 2.x and its desktop interface.
Without demerit to the original poster, whose points were quite valid, a lot of responses suggested ways to solve about 80% of his complaints about Unity. However, the fact that it took a team of experts to solve the problems that a user (and another expert, at that) was experiencing, is testament to the fact that Unity could still be made more intuitive, easier and more customizable.
I finally upgraded to Ubuntu 11.04 and Unity this past weekend. Like many, I experienced some usability issues, where the desktop wasn’t behaving the way I was used to. However, my use of the system means that I basically want the UI to stay out of my way. So the main change I had to make was to get the Unity dock to auto-hide, so that it only appears when I ask it to. The rest of the time it’s hidden away. Everything else, well, it’s admittedly different than what I’m used to, but that’s change for you. Was Unity making a change for change’s sake? Maybe so, but I think it’s change in the right direction. Even if it somewhat alienates experienced users (for whom, however, workarounds exist that handle nearly all their concerns), I think the true success of Unity is in how it works for new users. And here are two examples.
Another coworker posted his experience with showing Ubuntu and Unity to a newbie, fresh-from-Windows user. The user’s comments were along the lines of “this looks nice”, “It’s easy to use” and “I’m keeping it”.
Also, even though some have complained about the app lens being hard to use (and it’s a complaint I’ve seen already twice), I’ve seen users realize “but hey, if it’s really that messy, you can use the search field to find what you need, right?”. So yes, end users are realizing this, and it’s just a matter of polishing how things work. If all, I think it’s great to move users away from the “the computer has only two buttons” mindset and get them using the keyboard a little more.
So yes indeed, I’m staying on Unity, and I’m looking forward to seeing it maturing into a better desktop interface. as Mark Shuttleworth said, it’s a foundation on which the next generations of Ubuntu user experience will be built. I’ll be thrilled to be along for the ride.
Finally, for a great write on why your desktop changed, and why the developers would appreciate you giving it a whirl and helping improve it (even just commenting on the stuff you find hard, unintuitive or just plain wrong) is better than just swearing off these newfangled changes (without which, face it, you’d still be using fwm and MIT Athena widgets), please drop by Federico Mena-Quintero’s activity log and read his wonderful and short article “Moving into your new Gnome 3 house“.
It’s long been argued that peripheral support in Linux is far inferior to that under Windows, and that this has been a factor for Windows’ dominance in the desktop. More and more, the myth that Windows has any kind of technical superiority leaves place to the fact that marketing, and being bundled with nearly every PC sold worldwide, are Windows’ only keys to its widespread adoption. And here’s a story to prove that point.
I bought a printer (HP Photosmart C4780). It’s one of those cheap, $50 numbers that eat through ink like crazy. So I come home, wondering if I’ll have to install 500 MB of crap as included in the bundled CD to get the printer to work with my Mac at home.
As is usually the case with the Mac, I just plugged it in and it worked, both the printer and the scanner, without a hitch or problem.
I then proceeded to do the same on a freshly installed Ubuntu 10.10 laptop. Same story, the printer just worked, and Ubuntu even recognized it when being plugged in, no need to install drivers or anything.
Now, on Windows the printer wouldn’t have worked at all without installing a boatload of crap, HP is notoriously bloaty when it comes to their bundled software.
The usual wisdom is that hardware manufacturers care more about Windows, and ship all their hardware with drivers and stuff to make it work. It would seem, then, that the burden is on Apple and Linux distributions to provide drivers and support to most hardware. It would seem like a daunting task. But they do it, and the end result is that Mac OS and most Linux distros include drivers for everything, right out of the box. This puts them a step ahead of Windows, when it comes to ease of use, at the cost of maybe a slight bloat. Still, my Ubuntu installation is much leaner than the 16-GB behemoth that is Windows 7.
So there you have it, the myth of better hardware support on Windows, finally debunked.
Now, if I could only get the braindead wireless support on the HP printer to work…
I’ve always been a hater of Macromedia/Adobe Flash. Now that the entire Apple-Adobe controversy has rekindled the debate of whether the web is a better or worse place because of Flash, I realized why it is I don’t like Flash.
Also, I realized most technically-inclined people dislike Flash too, because they recognize a lot of its shortcomings, unlike the layperson who only cares about the web being pretty, full of animations and beeps and stuff.
Now, before I begin, let me state this: I’m griping about Flash as a web content creation platform/tool. I couldn’t care less about its use as a mobile development tool. A lot of bloggers have expressed more informed opinions on this topic.
For me, a true flash hater, what Flash does is take control away from the end-user, the consumer of content, and give it to the content creator, the designer.
If you’re the designer this is all fine and dandy; you can control exactly what the user sees, you can tell your application to be exactly this many pixels wide, this many pixels high, and how to look and behave down to the pixel and the microsecond. This is why designers love Flash; it not only lets them work in a familiar environment and with familiar tools, but it also gives them complete control about how and what the user sees and can do.
By the way, don’t be fooled; a designer that claims to know web design but uses only Flash is not a web designer. Flash was created to allow designers (Adobe’s primary clientele) to be able to say (untruthfully) they can design web sites.
The problem is, the web wasn’t meant to be this way. Fundamentally, the kind of content the web was created for, was meant to empower the user. This is why the web browser was designed from the very beginning to not impose those very parameters (width, height, fonts, and so on); the content should adjust to whatever the user’s agent can display. So web content reflows to adapt to your browser; it should degrade for those systems that for any reason lack a certain capability (think Lynx and visually-impaired users). It should also allow me, the user, to alter how it looks and is rendered. This is why I can disable cookies, javascript, replace or even remove altogether the CSS used to format my content, decide not to display images, and so on. Even the most complex non-flash web page consists of text and images; and with a bit of cleverness I can get both the text and the images and incorporate them in the rest of my workflow; paste them into a document, translate them, email them to someone else, the possibilities are limitless since web content is delivered to me as-is, as bytes I can not only look at, but also manipulate as I would any other kind of information on my computer.
This freedom is lost on a Flash-only (or mostly) website. What’s worse, instead of the content being, well, content, stuff I can get out of the browser and process and manipulate in other ways, it becomes merely an image, a photograph or a movie trapped in the clutches of the Flash plugin. I can’t copy the text, I can’t scroll except through the provisions the designer made for me, I can’t easily extract the audio or the images, and I’m basically limited, not by the constraints of my browser, but by those set forth by both Adobe through its display plugin, and the designer. And let’s face it, most designers are also clueless about user interfaces and ease-of-use, unlike the people who designed my web browser, which is rendered mostly useless on a Flash site.
It is this loss of freedom that makes Flash so dangerous, and why I think it would be a good thing for Flash to disappear eventually.
Flash adds nothing of true value to the Web, as we could all live happy without all the animations, all the desktop-apps-masquerading-as-web-apps made in Flash (write a Web app from the ground up, it’s not that hard), all the stupid content that forces me to work its way instead of my way, and luckily, thanks to the advent of HTML5, the one thing for which Flash has proven to be indispensible (web video) we won’t need it even for that. Because, let’s face it, web video was Flash’s killer application; everything else that could once be done only in Flash is now doable in AJAX, CSS and Javascript. And honestly, if Flash had been such a good technology for those things, we would have stayed with it and not bothered with anything else.
If anything, the existence of so many alternatives to Flash and whatever it can do, is evidence that the world at large truly does not like Flash.