You’re probably familiar with whatismyip services. One problem with these is that they wrap the IP data in a visually-pleasing but impossible to parse smorgasboard of HTML.
I needed to determine external IP for a text-only host with somewhat limited tools, and I came across the wonderful ifconfig.me page. This basically does the same as whatismyip but with lightweight and easily parsable output. This, for instance, returns *only* the system’s external or public IP address:
curl http://ifconfig.me/ip
Several endpoints are provided for you to poke at your connection’s externally-visible information. For the ultimate in parsability and machine-readability, a complete json dump is provided here: http://ifconfig.me/all.json.
Recently I’ve had better success with http://ifconfig.co which works mostly similarly to ifconfig.me but is a bit faster.
Most of us have wanted, at some time or another, to share an entire “session” on the terminal. I mean showing a log of the commands we typed, their output, and so on, to illustrate a procedure or clarify a concept.
The “script” command has long been a tool of choice for this. To use it, just type:
this will seem to start a new shell process and start recording everything you type and everything that other commands output in response. To stop recording, just type “exit”. A file called typescript will be created with your session. If you want, you can call script with a parameter (script your-file.log) to log to that file instead.
A newer implementation of the concept is ttyrec. It behaves mostly the same as script, but instead of producing openable text files, it logs keystrokes and timing information. You need to play these back using ttyplay, but the result is pretty amazing because you can see the keystrokes being played back as they were typed. You can also instruct ttyplay to just dump the session to a plain text file, which mimics script’s behavior.
Finally, to take this concept one step further, have a look at showterm, which does essentially the same as ttyrec but automatically saves and uploads the session to a website for you to share with people. Think of it as an interactive pastebin.
Virtual machines are very useful for testing. I often use them to verify changes to software, without messing up the local environment. Due to laziness I use VirtualBox and install Ubuntu official ISOs on them, rather than something more elegant/complicated such as kvm, lxc containers or chroots. This replicates an actual desktop environment pretty closely so is ideal for reporting bugs and validating that fixes to software work as expected.
Taking a virtual machine to a point where it’s mostly usable is a bit involved. I launched the desktop ISO, did the manual install procedure, rebooted, installed the VirtualBox extensions so I could mount the host’s drives, did some group changes, rebooted again… this is getting a bit tiring!
I had a quick look at Vagrant to see if it could somehow ease the task. It’s very interesting but didn’t really work in this case, as the virtual machine still has to be set up the way I describe before being able to package and then use it. What I’m after, really, is a way to set up a VM from scratch, just by doing the installation and adding a few extra packages.
This is what preseeding does, but up until now I had only played with local preseeds, baked into the ISO image. I imagined being able to load a preseed from the network would be difficult to set up quickly, and on a personal workstation, which is what would best fit my use case.
Turns out that virtualbox and a simple python module make this very easy. With the default configuration (NAT networking), a virtualbox VM will get an IP address through DHCP, and it will be able to reach the host’s public IP address. So as long as we configure the Ubuntu installer correctly and have something serving that file, things are very easy. One of the parts I like about this is that experimenting with this is as easy as changing the local preseed and rebooting the VM. About the only cumbersome part is typing the kernel parameters every time, but since there’s only three of them to type/change, this is not as bad as it sounds.
- Put your preseed files in a directory (called, for instance, preseed.cfg).
- Change to this directory and run python -m SimpleHTTPServer. This starts a miniature HTTP Server on port 8000.
- If you like, verify that the preseed is served properly: wget http://:8000/preseed.cfg
- Set up the virtual machine, point it to the Ubuntu installation CD, start it.
- When you get the keyboard and human icon, press any key.
- Move to “install Ubuntu” but don’t press Enter.
- Press F6 to access the “advanced mode”. At this point we’re modifying the kernel command line.
- Go to the beginning, delete the “file=” portion.
- Add “auto url=http://:8000/preseed.cfg”.
- Replace “only-ubiquity” with “automatic-ubiquity”.
- Press Enter
- Sit back and relax while the virtual machine gets installed.
This fits the bill perfectly for me, it removes the manual steps in setting up a testing VM (which I don’t need to keep afterwards, so I can just delete it and recreate with the same procedure), allows for easy experimentation and customization, and doesn’t use a lot of strange technologies or components.
Here’s a link to a sample, basic preseed file. You can customize mainly the late_command (rather, the success_command for ubiquity) and anything else you like. The installation-guide-amd64 package has more details and sample preseed files.
Note that for server installations the kernel command line will be a bit different:
- No need to add automatic-ubiquity.
- You DO need to add the “auto url=blahblah” part.
- For it to be 100% automated, you need to specify a few parameters that in debian-installer are requested *before* the preseed is loaded. Add these: debconf/priority=critical locale=en_US console-setup/ask_detect=false console-setup/layoutcode=us netcfg/choose_interface=auto
- Note that for debian-installer, the late_command is used as opposed to the ubiquity/success_command.
Reference
Debian preseeding guide
Ubiquity automation
avconv replaces the venerable ffmpeg. It can be used to convert videos for the iPhone quite easily.
apt-get install avconv libavcodec-extra-53 libx264-123 x264
then run this script:
avconv -i input-file.mp4 \
    -vcodec libx264 -vprofile high \
    -t 30 \
    -preset slow \
    -b:v 1000k -maxrate 1000k \
    -bufsize 2000k -vf scale=1136:474 \
    -acodec libvo_aacenc -b:a 192k output_file.mp4
Another example. This uses time to calculate elapsed time, also nice and ionice to try to reduce impact on system resources. It forces downsampling to two audio channels (-ac 2), useful if the source audio stream is in e.g. 5.1 format.
time ionice -c 3 nice -20  avconv  -i whatever.avi  \
-vcodec libx264 -vprofile high -preset slow -b:v 1000k\
 -maxrate 1000k -bufsize 2000k  -acodec libvo_aacenc \
-ac 2 -ab 112k output.mp4
A final example which forces a specific aspect ratio. The source video had the correct pixel dimensions but a bad aspect ratio was encoded in the original file (and was carried over to the recoded one), making it look squished.
avconv  -i input.avi  -vcodec libx264 -aspect 16:9 \
-vprofile high -preset slow -b:v 1900k -maxrate 1900k \
-bufsize 3800k  -acodec libvo_aacenc -ac 2 -ab 112k output-iphone.mp4
Usually when I needed to paste stuff from a text file into a GUI program (most commonly, the browser), I resorted to opening the text file in gedit and copying/pasting from there. Using the X clipboard by selecting text with the mouse kinda worked, but it’s subject to Vim’s visual representation of the text, which may include unwanted display-related breaks. So using gedit was the easiest, but also awfully kludgy solution.
I did some research and learned that vim does have direct access to the X clipboard. I tried the commands they mention (basically "+y to yank selected text, then I tried to paste in a GUI application; or "+p to paste from the current X clipboard). They didn’t work. My installed version of Vim in Ubuntu lacked the xterm_clipboard setting. I was in despair!
Then I came across this bug report in Launchpad. Upon reading it I realized that it was as simple as installing vim-gtk. I had never considered this, as it includes a graphical Vim version which I have absolutely no use for. However the bug report mentions that it also includes a text version of vim compiled with X clipboard support. So I installed, fired up Vim, and the feature works well!
I can now have a buffer with long lines, with :set wrap and :set linebreak, which would be afwul if I cut/pasted it with the mouse. I can select text using vim commands and just yank it into the + register, and it’s instantly available in the X clipboard. Bliss!
( I’ve removed this post since the instructions are obsolete - visit https://juju.is to get more)
When I launch a long-running process I like to forget about it, but how do I know when it’s finished?
You can of course have it send an email after it finishes:
long_process; echo "finished" |mail -s "finished" you@somewhere.com
For this to work, it’s very useful to have ssmtp or msmtp configured, so you have a sane, working local SMTP agent.
You can also send the notification only if the command succeeds:
long_process && echo "finished" |mail -s "finished" you@somewhere.com
OK, so you forgot to add the notification to your initial command line. You can use a loop to monitor a particular process and notify you when it’s done.
In this case I’ll be monitoring an instance of netcat. Determining the process name is up to you 🙂 The delimiters $ and ^ look for the executable names only.
The while loop will run while the process exists; once the process disappears the loop continues with the next instruction in the line, which is popping up an alert on the desktop and then sending an email. So if I’m not glued to the desktop, I’ll still get an email when this is done.
while pgrep $nc^; do sleep 5; done; alert; (echo "finished" |mail -s "finished" you @somewhere.com)
If you use find, it outputs full paths, which may not always be desirable. Turns out find has a -printf action with which you can do niceties such as outputting plain filenames (as if you’d used basename on them, but this means one less command on your pipeline):
find data/{audio,documents,images,video,websites}/ -type f -printf "%f\n"
The -printf command has a lot of formatting variables and possibilites! give it a try, look at the man page for more information.
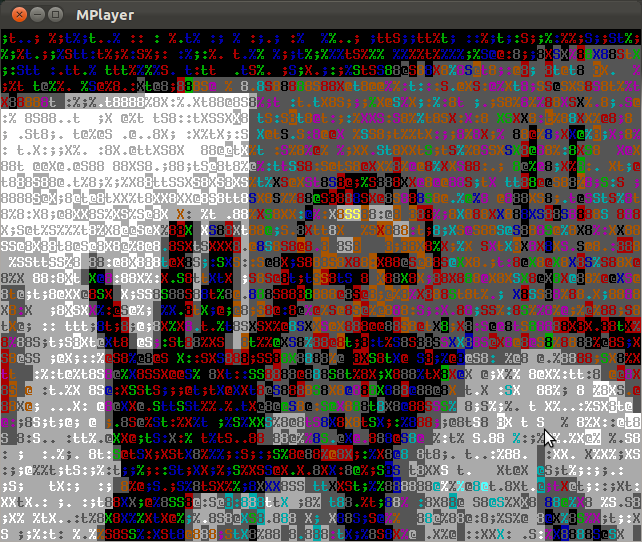
If you’re a CLI jockey you may enjoy looking at a nice ASCII rendering of your face via your webcam:
mplayer -vo caca tv:// -tv driver=v4l2:width=640:height=480:device=/dev/video0
Or to watch your favorite video in ASCII rendering:
vlc --vout caca some-file.avi

So the problem was to draw people at random from a list. The list is contained in a leads.txt text file, one per line.
This nifty one-liner will output a randomly-picked person from that file every time it’s invoked. it’ll then remove the name from the file so it doesn’t get repeated again.
export i=`sort leads.txt |shuf |head -1` ; echo $i; sed -i "s/^$i$//;/^$/d" leads.txt
It can be shortened by changing shuf |head 1 to shuf -h 1.
If you’d rather avoid deleting already-chosen entries from the file, this version just comments the names it picks:
export i=`sort leads.txt |grep -v \# |shuf |head -1` ;echo $i; sed -i "s/^$i$/#$i/" leads.txt