I had a hell of a time configuring Munin to send out e-mail alerts if values surpass specific thresholds. Many of the articles I found focused just on setting up the email command (which was the easy part), while few told me *how* to configure the per-service thresholds.
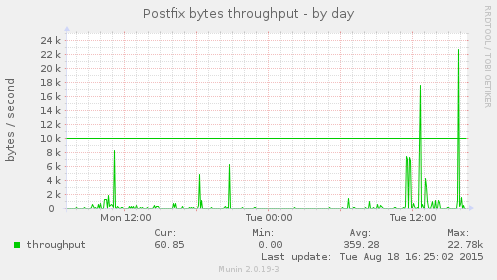
Once the thresholds are configured, you’ll see a green line for the warning threshold and a blue line for the critical one, like in this graph:
Some of Munin’s plugins already have configured thresholds (such as disk space monitoring which will send a warning at 92% usage and a critical alert at 96% or so). But others don’t, and I wanted to keep an eye on e.g. system load, network throughtput and outgoing e-mail.
The mail command can be configured in /etc/munin-conf.d/alerts.conf:
contact.myname.command mail -s "Munin ${var:group} :: ${var:host}" thisisme@somewhere.com
Next in /etc/munin.conf, under the specific host I want to receive alerts for, I did something like:
This will send alert if the postfix plugin’s volume surpasses 100k, if the load plugin’s load values surpass 1.0 or 5.0 (warning and critical, respectively) and if df plugin’s _dev_sda1 value is over 60% (this is disk usage).
Now here’s the tricky part: How to figure out what the plugin name is, and what the value from this plugin is? (if you get these wrong, you’ll get the dreaded UNKNOWN is UNKNOWN alert).
Just look in /etc/munin/plugins for the one that monitors the service you want alerts for. Then run it with munin-run, for example, for the memory plugin:
As part of a project I’m working on, I wanted to be able to do some “side processing” while writing to a file-like object. The processing is basically checksumming on-the-fly. I’m essentially doing something like:
what I’d like is to be able to also get the data read from source and use hashlib’s update mechanism to get a checksum of the object. The easiest way to do it would be using temporary storage (an actual file or a StringIO), but I’d prefer to avoid that since the files can be quite large. The second way to do it is to read the source twice. But since that may come from a network, it makes no sense to read it twice just to get the checksum. A third way would be to have destination be a file-like derivative that updates an internal hash with each read block from source, and then provides a way to retrieve the hash.
Instead of creating my own file-like where I’d mostly be “passing through” all the calls to the underlying destination object (which incidentally also writes to a network resource), I decided to use padme which already should do most of what I need. I just needed to unproxy a couple of methods, add a new method to retrieve the checksum at the end, and presto.
A first implementation looks like this:
#!/usr/bin/pythonfrom__future__importprint_functionimporturllib2asrequestlibimporthashlibimportpadmeclasssha256file(padme.proxy):@padme.unproxieddef__init__(self,*args,**kwargs):self.hash=hashlib.new('sha256')returnsuper(sha256file,self).__init__()@padme.unproxieddefwrite(self,data):self.hash.update(data)returnsuper(sha256file,self).write(data)@padme.unproxieddefgetsha256(self):returnself.hash.hexdigest()url="http://www.canonical.com"request=requestlib.Request(url)reader=requestlib.urlopen(request)withopen("output.html","wb")asdestfile:proxy_destfile=sha256file(destfile)forread_chunkinreader:proxy_destfile.write(read_chunk)print("SHA256 is {}".format(proxy_destfile.getsha256()))
This however doesn’t work for reasons I was unable to fathom on my own:
This is clearly because super(sha256file, self) refers to the *class* and I need the *instance* which is the one with the write method. So Zygmunt helped me get a working version ready:
#!/usr/bin/pythonfrom__future__importprint_functiontry:importurllib2asrequestlibexcept:fromurllibimportrequestasrequestlibimporthashlibimportpadmefrompadmeimport_loggerclassstateful_proxy(padme.proxy):@padme.unproxieddefadd_proxy_state(self,*names):""" make all of the names listed proxy state attributes """cls=type(self)cls.__unproxied__=set(cls.__unproxied__)cls.__unproxied__.update(names)cls.__unproxied__=frozenset(cls.__unproxied__)def__setattr__(self,name,value):cls=type(self)ifnamenotincls.__unproxied__:proxiee=cls.__proxiee___logger.debug("__setattr__ %r on proxiee (%r)",name,proxiee)setattr(proxiee,name,value)else:_logger.debug("__setattr__ %r on proxy itself",name)object.__setattr__(self,name,value)def__delattr__(self,name):cls=type(self)ifnamenotincls.__unproxied__:proxiee=type(self).__proxiee___logger.debug("__delattr__ %r on proxiee (%r)",name,proxiee)delattr(proxiee,name)else:_logger.debug("__delattr__ %r on proxy itself",name)object.__delattr__(self,name)classsha256file(stateful_proxy):@padme.unproxieddef__init__(self,*args,**kwargs):# Declare 'hash' as a state variable of the proxy itselfself.add_proxy_state('_hash')self._hash=hashlib.new('sha256')returnsuper(sha256file,self).__init__(*args,**kwargs)@padme.unproxieddefwrite(self,data):self._hash.update(data)returntype(self).__proxiee__.write(data)@padme.unproxieddefgetsha256(self):returnself._hash.hexdigest()url="http://www.canonical.com"request=requestlib.Request(url)reader=requestlib.urlopen(request)withopen("output.html","wb")asdestfile:proxy_destfile=sha256file(destfile)forread_chunkinreader:proxy_destfile.write(read_chunk)print("SHA256 is {}".format(proxy_destfile.getsha256()))
here’s the explanation of what was wrong:
– first of all the exception tells you that the super-object (which is a relative of base_proxy) has no write method. This is correct. A proxy is not a subclass of the proxied object’s class (some classes cannot be subclasses). The solution is to call the real write method. This can be accomplished with type(self).\__proxiee__.write()
– second of all we need to be able to hold state, namely the hash attribute (I’ve renamed it to _hash but it’s irrelevant to the problem at hand). Proxy objects can store state, it’s just not terribly easy to do. The proxied object (here a file) may or may not be able to store state (here it cannot). The solution is to make it possible to access some of the state via standard means. The new (small) satateful_proxy class implements __setattr__ and __delattr__ in the same way __getattribute__ was always implemented. That is, those methods look at the __unproxied__ set to know if access should be routed to the original or to the proxy.
– the last problem is that __unproxied__ is only collected by the proxy_meta meta-class. It’s extremely hard to change that meta-class (because padme.proxy is not the real class that you ever use, it’s all a big fake to make proxy() both a function-like and class-like object.)
The really cool thing about all this is not so much that my code is now working, but that those ideas and features will make it into an upcoming version of Padme 🙂 So down the line the code should become a bit simpler.
As part of the team that maintains several testing tools for Ubuntu, including checkbox, I sometimes find myself needing to build .deb packages from our source tree.
'building stuff is hard'
A simple way of achieving this is of course to run dpkg-buildpackage or even bzr-buildpackage. Assuming all build-deps are correctly installed in the host system, this will result in a nicely built set of .debs.
This approach has a few caveats, in that it’s different from the build process actually employed to create the packages that ultimately get uploaded to Ubuntu (or even the ones available in Launchpad PPAs).
The two main differences are that Launchpad builds the packages in a “clean” environment, installing build-deps from scratch, whereas dpkg-buildpackage will rely on what’s installed in the system. So if you miss specifying a build-dep, your local build may work because you have it installed, but the PPA build will fail because it will not be present.
The second big difference is that with the local approach, you’re “limited” to building packages for the “host” system. Sure, you can specify a different target release in your debian/changelog file, but some aspect of your build may be tied to your system’s tools, versions and layout, and if for some reason they don’t match the actual target at installation time, things will fail in interesting ways.
Clearly, one way to test what the Launchpad build process will spit out is to build a source package and dput that to be built directly on a PPA. The problem here is that the feedback loop becomes excruciatingly slow; PPAs are a shared resource and build times can go from minutes to many hours.
Based on all this, it makes sense to try to use a local build environment that more closely replicates what PPAs do to build your packages.
Fortunately, the PPA builders use free software, so it’s relatively easy to do local builds in a similar environment, completing quickly due to use of local resources, and only upload to Launchpad once you’re pretty sure your build will succeed.
The software in question is sbuild, and I already wrote a post detailing how to install sbuild and set up a build environment for any Ubuntu release you need.
This setup worked fine for the occasional package build when you know packaging is mostly correct. For a fast build such as checkbox, setting up the build environment with all needed packages and build-deps takes about 10 minutes (depending mostly on download speed for all the packages). Of course on a more complex package, compilation time may start to be a factor.
Anyway, the 10-minute time can be too slow if you’re trying to fix a tricky problem and need a fast feedback loop. Plus the process produces a lot of transient files and downloads a set of packages many times, so there’s plenty of room for improvement here.
A large part of the time spent doing the “local” part of the process is writing files to disk. One way to speed this up is to use a ramdisk to store the build. I’m too lazy and have too little RAM to use this approach, so the alternative was setting up eatmydata inside the chroot. Since these are mostly temporary files or throwaway packages, it’s OK to lose the safety of constant syncs in exchange for a huge boost in speed.
The setup for eatmydata inside the chroot is described here. This looks a bit hard to automate, but luckily we don’t have to, as recent versions of mk-sbuild simply support a –eatmydata parameter, if given this will install eatmydata inside the chroot and do the choot config file change to enable eatmydata.
Adding PPA
You can add a custom PPA to an image. Once the chroot image is built, enter the “golden master”:
sudo schroot -c source:saucy-amd64 -u root
You can add a deb line (get it from launchpad) to your sources:
cat >>/etc/apt/sources.list.d/something.list
 # Copy line here
Then you need to get the GPG key for the PPA and add it manually with the very basic tools provided in the chroot (sorry, no apt-add-repository):
apt-key add -
# Paste GPG armored key here
Then exit the golden image. After this, your builds from this chroot will be able to fetch packages from the PPA.
Again, that’s a bit of work to do for each VM. Instead, what I did was create a file in /etc/schroot/setup.d to do this automatically. You can of course replace the PPAs you need in the echo lines at the end. Name the file something like 81add-ppas:
Notice that again, I was very lazy and instead of downloading the gpg keys as shown above (as for some reason trying to run gpg from the setup script didn’t work), I just configured apt to allow unauthenticated packages. Since this sbuild is mainly for testing purposes it’s not a big deal to skip this verification step. Also, there’s some logic to automatically detect the chroot release, so the same config file works equally well for any Ubuntu release.
Apt-cacher-ng
As the name suggests, this nifty utility will cache packages so the next time you need them they’ll be fetched from local storage rather than from the network. A bit of config is needed to have sbuild download packages from here.
First, install apt-cacher-ng on the host system. You can verify it’s listening on port 3142 by any means you like.
Then, to set it up automatically in chroots, add this to the host system’s /etc/schroot/setup.d/80apt-cacher-ng (rather, create that file; it doesn’t exist by default):
#!/bin/sh
 set -e
 . "$SETUP_DATA_DIR/common-data"
 . "$SETUP_DATA_DIR/common-functions"
 . "$SETUP_DATA_DIR/common-config"
 if [ $STAGE = "setup-start" ] || [ $STAGE = "setup-recover" ]; then
 echo "# Added by the schroot setup mechanism (roadmr)" > "${CHROOT_PATH}/etc/apt/apt.conf.d/80proxy"
 echo "Acquire::http::Proxy \"http://127.0.0.1:3142\";" >> "${CHROOT_PATH}/etc/apt/apt.conf.d/80proxy"
fi
With these two setup.d scripts and the –eatmydata magic, it’s easy to create sbuild environments which will be much faster when building packages.
As a comparison, building msmtp (chosen because this tests mainly the speedup components, not needing any packages from a PPA) takes about 40 seconds with these suggested tweaks:
It looks like they’re about 3 times faster, but that’s misleading because I deliberately chose a small, quick-to-compile package. Still, you can at least reduce network and disk access very easily now. Note, also, that my test system has a fast SSD. Speedup on a traditional rotary magnetic hard-disk is likely to be much higher.
Projects on github will show a README or README.md file directly on the project page. This is a good place to give some introduction or quick instructions for your project. This supports Markdown, which allows you to craft a README that will both be readable when seen in plain text, and will render nicely when seen directly in github.
Here’s a handy Markdown syntax reference and tutorial. Also, at some point I needed clarification on how to make nested lists, which I found in StackOverflow. There’s a wealth of Markdown-related information on the web!
Two useful tidbits. To render a markdown document to HTML, for previewing so you don’t have to upload stuff to github just to see what your README will look like,
apt-get install python-markdown
and then run
markdown_py
on your README.md.
Also, vim supports markdown and will do its best to help you, but one unhelpful thing is its insistence to render underscores (_) in inverted text (as it assumes it’s the beginning of an underlined section). Just a warning 🙂
Most of us have wanted, at some time or another, to share an entire “session” on the terminal. I mean showing a log of the commands we typed, their output, and so on, to illustrate a procedure or clarify a concept.
The “script” command has long been a tool of choice for this. To use it, just type:
script
this will seem to start a new shell process and start recording everything you type and everything that other commands output in response. To stop recording, just type “exit”. A file called typescript will be created with your session. If you want, you can call script with a parameter (script your-file.log) to log to that file instead.
A newer implementation of the concept is ttyrec. It behaves mostly the same as script, but instead of producing openable text files, it logs keystrokes and timing information. You need to play these back using ttyplay, but the result is pretty amazing because you can see the keystrokes being played back as they were typed. You can also instruct ttyplay to just dump the session to a plain text file, which mimics script’s behavior.
Finally, to take this concept one step further, have a look at showterm, which does essentially the same as ttyrec but automatically saves and uploads the session to a website for you to share with people. Think of it as an interactive pastebin.
Virtual machines are very useful for testing. I often use them to verify changes to software, without messing up the local environment. Due to laziness I use VirtualBox and install Ubuntu official ISOs on them, rather than something more elegant/complicated such as kvm, lxc containers or chroots. This replicates an actual desktop environment pretty closely so is ideal for reporting bugs and validating that fixes to software work as expected.
Taking a virtual machine to a point where it’s mostly usable is a bit involved. I launched the desktop ISO, did the manual install procedure, rebooted, installed the VirtualBox extensions so I could mount the host’s drives, did some group changes, rebooted again… this is getting a bit tiring!
I had a quick look at Vagrant to see if it could somehow ease the task. It’s very interesting but didn’t really work in this case, as the virtual machine still has to be set up the way I describe before being able to package and then use it. What I’m after, really, is a way to set up a VM from scratch, just by doing the installation and adding a few extra packages.
This is what preseeding does, but up until now I had only played with local preseeds, baked into the ISO image. I imagined being able to load a preseed from the network would be difficult to set up quickly, and on a personal workstation, which is what would best fit my use case.
Turns out that virtualbox and a simple python module make this very easy. With the default configuration (NAT networking), a virtualbox VM will get an IP address through DHCP, and it will be able to reach the host’s public IP address. So as long as we configure the Ubuntu installer correctly and have something serving that file, things are very easy. One of the parts I like about this is that experimenting with this is as easy as changing the local preseed and rebooting the VM. About the only cumbersome part is typing the kernel parameters every time, but since there’s only three of them to type/change, this is not as bad as it sounds.
Put your preseed files in a directory (called, for instance, preseed.cfg).
Change to this directory and run python -m SimpleHTTPServer. This starts a miniature HTTP Server on port 8000.
If you like, verify that the preseed is served properly: wget http://:8000/preseed.cfg
Set up the virtual machine, point it to the Ubuntu installation CD, start it.
When you get the keyboard and human icon, press any key.
Move to “install Ubuntu” but don’t press Enter.
Press F6 to access the “advanced mode”. At this point we’re modifying the kernel command line.
Go to the beginning, delete the “file=” portion.
Add “auto url=http://:8000/preseed.cfg”.
Replace “only-ubiquity” with “automatic-ubiquity”.
Press Enter
Sit back and relax while the virtual machine gets installed.
This fits the bill perfectly for me, it removes the manual steps in setting up a testing VM (which I don’t need to keep afterwards, so I can just delete it and recreate with the same procedure), allows for easy experimentation and customization, and doesn’t use a lot of strange technologies or components.
Here’s a link to a sample, basic preseed file. You can customize mainly the late_command (rather, the success_command for ubiquity) and anything else you like. The installation-guide-amd64 package has more details and sample preseed files.
Note that for server installations the kernel command line will be a bit different:
No need to add automatic-ubiquity.
You DO need to add the “auto url=blahblah” part.
For it to be 100% automated, you need to specify a few parameters that in debian-installer are requested *before* the preseed is loaded. Add these: debconf/priority=critical locale=en_US console-setup/ask_detect=false console-setup/layoutcode=us netcfg/choose_interface=auto
Note that for debian-installer, the late_command is used as opposed to the ubiquity/success_command.
Another example. This uses time to calculate elapsed time, also nice and ionice to try to reduce impact on system resources. It forces downsampling to two audio channels (-ac 2), useful if the source audio stream is in e.g. 5.1 format.
A final example which forces a specific aspect ratio. The source video had the correct pixel dimensions but a bad aspect ratio was encoded in the original file (and was carried over to the recoded one), making it look squished.
Usually when I needed to paste stuff from a text file into a GUI program (most commonly, the browser), I resorted to opening the text file in gedit and copying/pasting from there. Using the X clipboard by selecting text with the mouse kinda worked, but it’s subject to Vim’s visual representation of the text, which may include unwanted display-related breaks. So using gedit was the easiest, but also awfully kludgy solution.
I did some research and learned that vim does have direct access to the X clipboard. I tried the commands they mention (basically "+y to yank selected text, then I tried to paste in a GUI application; or "+p to paste from the current X clipboard). They didn’t work. My installed version of Vim in Ubuntu lacked the xterm_clipboard setting. I was in despair!
Then I came across this bug report in Launchpad. Upon reading it I realized that it was as simple as installing vim-gtk. I had never considered this, as it includes a graphical Vim version which I have absolutely no use for. However the bug report mentions that it also includes a text version of vim compiled with X clipboard support. So I installed, fired up Vim, and the feature works well!
I can now have a buffer with long lines, with :set wrap and :set linebreak, which would be afwul if I cut/pasted it with the mouse. I can select text using vim commands and just yank it into the + register, and it’s instantly available in the X clipboard. Bliss!