If you do any kind of support or deal with customers in any way, it’s likely that 80% of incoming requests can be served by sending a canned reply about one of a handful of common issues.
I keep my canned replies in a specific directory, copy them to the clipboard using xclip and then paste them in whichever web-based ticketing system the request comes from.
For this I used to rely on CTRL-R completion using fzf, but that’s becoming kind of unwieldy; so instead, I crafted an fzf-powered oneliner that gives me a responses command. I run that and I get a list of all the canned responses in the directory with auto-completion as per fzf, and also a nice preview window so I can ensure the text contains what I need to send. On pressing ENTER, this is put in the clipboard courtesy of xclip ready to be pasted.
function responses(){ xclip -selection c $(find ~/Documents/w/responses -type f | fzf --preview-window='up:40%' --preview 'cat {}')}
In an email thread with some colleagues, one of them mentioned that they had to force their laptop to use “deep” sleep instead of “s2idle”. This got me thinking - I’ve had the impression that my XPS13 sometimes doesn’t really suspend, and/or wakes up in the middle of the night, because the battery capacity sometimes is lower than it should be after being suspended overnight (going to sleep with 100% battery and having about 70% the morning afeter).
From here it looks like indeed s2idle is not really suspend-suspend and the system can wake up of its own accord according to unclear rules (or maybe they are clear, but I don’t care, I want the system to go to full sleep and only wake up when I open the lid or something similar). And it seems the way to get it to real deep-sleep is to write “deep” into /sys/power/mem_sleep. It further mentions that indeed s2idle is the default (which I confirmed by checking the above file), but it can be overridden by setting mem_sleep_default in the kernel command line.
It’s been a while since I last had to muck with GRUB configuration…
Just for kicks I also looked up mem_sleep_default and lo and behold, came upon a thread for the XPS 13 9310 (exactly the one I have).
The goal here is to instantiate VMs with a br0 interface grabbing an IP from the LAN DHCP, so in turn the VM can instantiate LXD containers whose IP is also exposed to the LAN. That way everything is visible on the same network segment and this makes some experimentation easier.
With this, on boot the system grabs an address from the network’s DHCP service (from my home router) and puts it on the br0 interface (which bridges enp7s0, a Gigabit Ethernet port).
The system also has avahi-daemon installed so I can ssh the-server.local easily.
VM configuration
Next, the VM which I created using uvt-kvm:
# Get a Xenial cloud imageuvt-simplestreams-libvirt --verbose sync release=xenial arch=amd64
# Create/launch a VMPARAMS='--memory 8192 --disk 32 --cpu 4'uvt-kvm create the-vm $PARAMS --bridge br0 --packages avahi-daemon,bridge-utils,haveged --run-script-once setup_network.sh
The setup_network.sh script takes care of setting up the network 🙂 This can more cleanly be done with cloud-init but I’m lazy and wanted something fast.
The script deletes the cloudconfig-created .cfg file, tells cloud-init to NOT reconfigure the network, and drops the config file I actually need in place.
#!/bin/bash
echo"Acquire::http::Proxy \"http://192.168.1.187:3128\"; " >/etc/apt/apt.conf.d/80proxy
# Drop the cloudinit-configured interfaceifdown ens3
# Reconfigure the network...cat <<EOF >/etc/network/interfaces.d/1-bridge.cfg
auto lo br0

iface lo inet loopback

iface ens3 inet manual

iface br0 inet dhcp
    bridge_ports ens3
    bridge_stp off       # disable Spanning Tree Protocol
    bridge_waitport 0    # no delay before a port becomes available
    bridge_fd 0          # no forwarding delay
EOFecho"network: {config: disabled}" > /etc/cloud/cloud.cfg.d/99-disable-network-config.cfg
rm /etc/network/interfaces.d/50-cloud-init.cfg
# Then bring up the new nice bridgeifup br0
apt-get remove -y snapd && apt-get -y autoremove
The network config in /etc/network/interfaces.d/1-bridge.cfg should look like:
auto lo br0
iface lo inet loopback
iface ens3 inet manual
iface br0 inet dhcp
bridge_ports ens3
bridge_stp off # disable Spanning Tree Protocol bridge_waitport 0# no delay before a port becomes available bridge_fd 0# no forwarding delay
LXD configuration
Finally, install lxd. When asked to configure the lxd bridge, respond
“no”, and on the next question you’ll be asked whether to
supply an existing bridge. Respond “yes” and specify
“br0”.
Now, when an lxd container is instantiated, it’ll by default appear on
the same network (the home network!) as the VM and the main host, getting its
DHCP from the home router.
When things break
Suddenly the bridge interface stopped working. I checked this to help diagnose
it. But that wasn’t it. Turns out, I’d installed Docker on the
main host and Docker messes with the firewall
configuration by setting
iptables -P FORWARD DROP. I just set it back to ACCEPT to get it working.
Recently I ran into a script which tried to verify HTTPS connection and response to a specific IP address. The “traditional” way to do this is (assuming I want http://example.com/some/path on IP 1.2.3.4):
This is useful if I want to specifically test how 1.2.3.4 is responding; for instance, if example.com is DNS round-robined to several IP addresses and I want to hit one of them specifically.
This also works for https requests if using Python <2.7.9 because older versions don’t do SNI and thus don’t pass the requested hostname as part of the SSL handshake.
However, Python >=2.7.9 and >=3.4.x conveniently added SNI support, breaking this hackish way of connecting to the IP, because the IP address embedded in the URL is passed as part of the SSL handshake, causing errors (mainly, the server returns a 400 Bad Request because the SNI host 1.2.3.4 doesn’t match the one in the HTTP headers example.com).
The “easiest” way to achieve this is to force the IP address at the lowest possible level, namely when we do socket.create_connection. The rest of the “stack” is given the actual hostname. So the sequence is:
Open a socket to 1.2.3.4
SSL wrap this socket using the hostname.
Do the rest of the HTTPS traffic, headers and all over this socket.
Unfortunately Requests hides the socket.create_connection call in the deep recesses of urllib3, so the specified chain of classes is needed to propagate the given dest_ip value all the way down the stack.
After wrestling with this for a bit, I wrote a TransportAdapter and accompanying stack of subclasses to be able to pass a specific IP for connection.
There are a good number of subtleties on how it works, because it messes with the connection stack at all levels, I suggest you read the README to see how to use it in detail and whether it applies to you need. I even included a complete example script that uses this adapter.
I’m working on adding some periodic maintenance tasks to a service deployed using Juju. It’s a standard 3-tier web application with a number of Django application server units for load balancing and distribution.
Clearly the maintenance tasks’ most natural place to run is in one of these units, since they have all of the application’s software installed and doing the maintenance is as simple as running a “management command” with the proper environment set up.
A nice property we have by using Juju is that these application server units are just clones of each other, this allows scaling up/down very easily because the units are treated the same. However, the periodic maintenance stuff introduces an interesting problem, because we want only one of the units to run the maintenance tasks (no need for them to run several times). The maintenance scripts can conceivably be run in all units, even simultaneously (they do proper locking to avoid stepping on each other). And this would perhaps be OK if we only had 2 service units, but what if, as is the case, we have many more? there is still a single database and hitting it 5-10 times with what is essentially a redundant process sounded like an unacceptable tradeoff for the simplicity of the “just run them on each unit” approach.
We could also implement some sort of duplicate collapsing, perhaps by using something like rabbitmq and celery/celery beat to schedule periodic tasks. I refused to consider this since it seemed like swatting flies with a cannon, given that the first solution coming to mind is a one-line cron job. Why reinvent the wheel?
The feature that ended up solving the problem, thanks to the fine folks in Freenet’s #juju channel, is leadership, a feature which debuted in recent versions of Juju. Essentially, each service has one unit designated as the “leader” and it can be targeted with specific commands, queried by other units (‘ask this to my service’s leader’) and more importantly, unambiguously identified: a unit can determine whether it is the leader, and Juju events are fired when leadership changes, so units can act accordingly. Note that leadership is fluid and can change, so the charm needs to account for these changes. For example, if the existing leader is destroyed or has a charm hook error, it will be “deposed” and a new leader is elected from among the surviving units. Luckily all the details of this are handled by Juju itself, and charms/units need only hook on the leadership events and act accordingly.
So it’s then as easy as having the cron jobs run only on the leader unit, and not on the followers.
The simplistic way of using leadership to ensure only the leader unit performs an action was something like this in the crontab:
* * * * * root if [ $(juju-run {{ unit_name }} is-leader) = 'True' ]; then run-maintenance.sh; fi
This uses juju-run with the unit’s name (which is hardcoded in the crontab – this is a detail of how juju run is used which I don’t love, but it works) to run the is-leader command in the unit. This will print out “True” if the executing unit is the leader, and False otherwise. So this will condition execution on the current unit being the leader.
Discussing this with my knowledgeable colleagues, a problem was pointed out: juju-run is blocking and could potentially stall if other Juju tasks are being run. This is possibly not a big deal but also not ideal, because we know leadership information changes infrequently and we also have specific events that are fired when it does change.
So instead, they suggested updating the crontab file when leadership changes, and hardcoding leadership status in the file. This way units can decide whether to actually run the command based on locally-available information which removes the lock on Juju.
The solution looks like this, when implemented using Ansible integration in the charm. I just added two tasks: One registers a variable holding is-leader output when either the config or leadership changes:
The second one fires on the same events and just uses the registered variable to write the crontabs appropriately. Note that Ansible’s “cron” plugin takes care of ensuring “crupdate” behavior for these crontab entries. Just be mindful if you change the “name” because Ansible uses that as the key to decide whether to update or create anew:
- name:create maintenance crontabstags: - config-changed - leader-elected - leader-settings-changedcron:name:"roadmr maintenance - {{item.name}}"special_time:"daily"job:"IS_LEADER='{{ is_leader.stdout }}'; if [ $IS_LEADER = 'True' ]; then {{ item.command }}; fi"cron_file:roadmr-maintenanceuser:"{{ user }}"with_items: - name:Delete all fooscommand:"delete_foos" - name:Update all barscommand:"update_bars"
A created crontab file (in /etc/cron.d/roadmr-maintenance) looks like this:
A few notes about this. The IS_LEADER variable looks redundant. We could have put it directly in the comparison or simply wrote the crontab file only in the leader unit, removing it on the other ones. We specifically wanted the crontab to exist in all units and just be conditional on leadership. IS_LEADER makes it super obvious, right there in the crontab, whether the command will run. While redundant, we felt it added clarity.
Save for the actual value of IS_LEADER, the crontab is present and identical in all units. This helps people who log directly into the unit to understand what may be going on in case of trouble. Traditionally people log into the first unit; but what if that happens to not be the leader? If we write the crontab only on the leader and remove from other units, it will not be obvious that there’s a task running somewhere.
Charm Ansible integration magically runs tasks by tags identifying the hook events they should fire on. So by just adding the three tags, these events will fire in the specified order on config-changed, leader-elected and leader-settings-changed events.
The two leader hooks are needed because leader-elected is only fired on the actual leader unit; all the others get leader-settings-changed instead.
Last but not least, on’t forget to also declare the new hooks in your hooks.py file, in the hooks declaration which now looks like this (see last two lines added):
Finally, I’d be remiss not to mention an existing bug in leadership event firing. Because of that, until leadership event functionality is fixed and 100% reliable, I wouldn’t use this technique for tasks which absolutely, positively need to be run without fail or the world will end. Here, I’m just using them for maintenance and it’s not a big deal if runs are missed for a few days. That said, if you need a 100% guarantee that your tasks will run, you’ll definitely want to implement something more robust and failproof than a simple crontab.
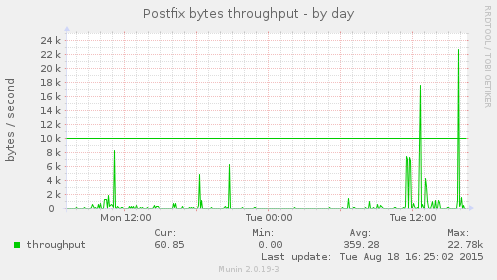
I had a hell of a time configuring Munin to send out e-mail alerts if values surpass specific thresholds. Many of the articles I found focused just on setting up the email command (which was the easy part), while few told me *how* to configure the per-service thresholds.
Once the thresholds are configured, you’ll see a green line for the warning threshold and a blue line for the critical one, like in this graph:
Some of Munin’s plugins already have configured thresholds (such as disk space monitoring which will send a warning at 92% usage and a critical alert at 96% or so). But others don’t, and I wanted to keep an eye on e.g. system load, network throughtput and outgoing e-mail.
The mail command can be configured in /etc/munin-conf.d/alerts.conf:
contact.myname.command mail -s "Munin ${var:group} :: ${var:host}" thisisme@somewhere.com
Next in /etc/munin.conf, under the specific host I want to receive alerts for, I did something like:
This will send alert if the postfix plugin’s volume surpasses 100k, if the load plugin’s load values surpass 1.0 or 5.0 (warning and critical, respectively) and if df plugin’s _dev_sda1 value is over 60% (this is disk usage).
Now here’s the tricky part: How to figure out what the plugin name is, and what the value from this plugin is? (if you get these wrong, you’ll get the dreaded UNKNOWN is UNKNOWN alert).
Just look in /etc/munin/plugins for the one that monitors the service you want alerts for. Then run it with munin-run, for example, for the memory plugin:
As part of a project I’m working on, I wanted to be able to do some “side processing” while writing to a file-like object. The processing is basically checksumming on-the-fly. I’m essentially doing something like:
what I’d like is to be able to also get the data read from source and use hashlib’s update mechanism to get a checksum of the object. The easiest way to do it would be using temporary storage (an actual file or a StringIO), but I’d prefer to avoid that since the files can be quite large. The second way to do it is to read the source twice. But since that may come from a network, it makes no sense to read it twice just to get the checksum. A third way would be to have destination be a file-like derivative that updates an internal hash with each read block from source, and then provides a way to retrieve the hash.
Instead of creating my own file-like where I’d mostly be “passing through” all the calls to the underlying destination object (which incidentally also writes to a network resource), I decided to use padme which already should do most of what I need. I just needed to unproxy a couple of methods, add a new method to retrieve the checksum at the end, and presto.
A first implementation looks like this:
#!/usr/bin/pythonfrom__future__importprint_functionimporturllib2asrequestlibimporthashlibimportpadmeclasssha256file(padme.proxy):@padme.unproxieddef__init__(self,*args,**kwargs):self.hash=hashlib.new('sha256')returnsuper(sha256file,self).__init__()@padme.unproxieddefwrite(self,data):self.hash.update(data)returnsuper(sha256file,self).write(data)@padme.unproxieddefgetsha256(self):returnself.hash.hexdigest()url="http://www.canonical.com"request=requestlib.Request(url)reader=requestlib.urlopen(request)withopen("output.html","wb")asdestfile:proxy_destfile=sha256file(destfile)forread_chunkinreader:proxy_destfile.write(read_chunk)print("SHA256 is {}".format(proxy_destfile.getsha256()))
This however doesn’t work for reasons I was unable to fathom on my own:
This is clearly because super(sha256file, self) refers to the *class* and I need the *instance* which is the one with the write method. So Zygmunt helped me get a working version ready:
#!/usr/bin/pythonfrom__future__importprint_functiontry:importurllib2asrequestlibexcept:fromurllibimportrequestasrequestlibimporthashlibimportpadmefrompadmeimport_loggerclassstateful_proxy(padme.proxy):@padme.unproxieddefadd_proxy_state(self,*names):""" make all of the names listed proxy state attributes """cls=type(self)cls.__unproxied__=set(cls.__unproxied__)cls.__unproxied__.update(names)cls.__unproxied__=frozenset(cls.__unproxied__)def__setattr__(self,name,value):cls=type(self)ifnamenotincls.__unproxied__:proxiee=cls.__proxiee___logger.debug("__setattr__ %r on proxiee (%r)",name,proxiee)setattr(proxiee,name,value)else:_logger.debug("__setattr__ %r on proxy itself",name)object.__setattr__(self,name,value)def__delattr__(self,name):cls=type(self)ifnamenotincls.__unproxied__:proxiee=type(self).__proxiee___logger.debug("__delattr__ %r on proxiee (%r)",name,proxiee)delattr(proxiee,name)else:_logger.debug("__delattr__ %r on proxy itself",name)object.__delattr__(self,name)classsha256file(stateful_proxy):@padme.unproxieddef__init__(self,*args,**kwargs):# Declare 'hash' as a state variable of the proxy itselfself.add_proxy_state('_hash')self._hash=hashlib.new('sha256')returnsuper(sha256file,self).__init__(*args,**kwargs)@padme.unproxieddefwrite(self,data):self._hash.update(data)returntype(self).__proxiee__.write(data)@padme.unproxieddefgetsha256(self):returnself._hash.hexdigest()url="http://www.canonical.com"request=requestlib.Request(url)reader=requestlib.urlopen(request)withopen("output.html","wb")asdestfile:proxy_destfile=sha256file(destfile)forread_chunkinreader:proxy_destfile.write(read_chunk)print("SHA256 is {}".format(proxy_destfile.getsha256()))
here’s the explanation of what was wrong:
– first of all the exception tells you that the super-object (which is a relative of base_proxy) has no write method. This is correct. A proxy is not a subclass of the proxied object’s class (some classes cannot be subclasses). The solution is to call the real write method. This can be accomplished with type(self).\__proxiee__.write()
– second of all we need to be able to hold state, namely the hash attribute (I’ve renamed it to _hash but it’s irrelevant to the problem at hand). Proxy objects can store state, it’s just not terribly easy to do. The proxied object (here a file) may or may not be able to store state (here it cannot). The solution is to make it possible to access some of the state via standard means. The new (small) satateful_proxy class implements __setattr__ and __delattr__ in the same way __getattribute__ was always implemented. That is, those methods look at the __unproxied__ set to know if access should be routed to the original or to the proxy.
– the last problem is that __unproxied__ is only collected by the proxy_meta meta-class. It’s extremely hard to change that meta-class (because padme.proxy is not the real class that you ever use, it’s all a big fake to make proxy() both a function-like and class-like object.)
The really cool thing about all this is not so much that my code is now working, but that those ideas and features will make it into an upcoming version of Padme 🙂 So down the line the code should become a bit simpler.
One of lxc’s nice time-saving features is that, after initial container creation, it will cache the files it downloaded to do so, and when you create a new container using the same template/version/architecture, it will leverage the existing files and create the container with minimal downloads and really quickly.
A downside of this is that the cache can become stale; this is apparent when you want to install a package in a container and apt-get gives 404 errors indicating the version of the package the container knows about, is no longer available in the archive (most likely superseded by a new one).
This is easily fixed by always doing apt-get update in the container prior to any package installs/upgrades. However, it’s cumbersome, and if you’re creating dozens of new containers every day, the bandwidth and time spent re-downloading can quickly add up.
To update the “base image” or cache, which resides in /var/cache/lxc for each version, you can do two things.
most templates also support --flush-cache so if you’re calling lxc-create directly, just add an extra --flush-cache as template args (after --) and the cache will be flushed before making the container. Something like
Sometimes you may want to configure a wireless interface on a system with Ubuntu Server. The most common use case (for me, at least) is to run some tests with server, which require two network interfaces, on a laptop (it’s what I have available to play with) with an ethernet interface and a wireless interface. As long as Ubuntu sees the wireless interface, it’s quite easy to set things up so the wireless comes up at boot time.
You will probably need to set up the server to forward and masquerade the internal network (usually, the ethernet segment is the internal one, while the wireless counts as the “outside” interface). There are plenty of tutorials to do this over the internet, so I won’t extend this post by detailing that.
Of course, the wireless will grab a dynamic IP address, so use caution with that as the address may change (or, assign a static one from your router’s unused range). Anyway. Put this in /etc/network/interfaces:
# This file describes the network interfaces available on your system# and how to activate them. For more information, see interfaces(5).# The loopback network interfaceauto lo
iface lo inet loopback
auto eth0
iface eth0 inet static
address 10.10.10.1
netmask 255.255.255.0
auto wlan0
iface wlan0 inet dhcp
wpa-ssid your-network-ssid
wpa-ap-scan 1wpa-proto RSN
wpa-pairwise CCMP
wpa-group CCMP
wpa-key-mgmt WPA-PSK
wpa-psk your-network-password
Then you can do ifup wlan0 to bring the interface up. It should also come up automagically at boot time.
As part of the team that maintains several testing tools for Ubuntu, including checkbox, I sometimes find myself needing to build .deb packages from our source tree.
'building stuff is hard'
A simple way of achieving this is of course to run dpkg-buildpackage or even bzr-buildpackage. Assuming all build-deps are correctly installed in the host system, this will result in a nicely built set of .debs.
This approach has a few caveats, in that it’s different from the build process actually employed to create the packages that ultimately get uploaded to Ubuntu (or even the ones available in Launchpad PPAs).
The two main differences are that Launchpad builds the packages in a “clean” environment, installing build-deps from scratch, whereas dpkg-buildpackage will rely on what’s installed in the system. So if you miss specifying a build-dep, your local build may work because you have it installed, but the PPA build will fail because it will not be present.
The second big difference is that with the local approach, you’re “limited” to building packages for the “host” system. Sure, you can specify a different target release in your debian/changelog file, but some aspect of your build may be tied to your system’s tools, versions and layout, and if for some reason they don’t match the actual target at installation time, things will fail in interesting ways.
Clearly, one way to test what the Launchpad build process will spit out is to build a source package and dput that to be built directly on a PPA. The problem here is that the feedback loop becomes excruciatingly slow; PPAs are a shared resource and build times can go from minutes to many hours.
Based on all this, it makes sense to try to use a local build environment that more closely replicates what PPAs do to build your packages.
Fortunately, the PPA builders use free software, so it’s relatively easy to do local builds in a similar environment, completing quickly due to use of local resources, and only upload to Launchpad once you’re pretty sure your build will succeed.
The software in question is sbuild, and I already wrote a post detailing how to install sbuild and set up a build environment for any Ubuntu release you need.
This setup worked fine for the occasional package build when you know packaging is mostly correct. For a fast build such as checkbox, setting up the build environment with all needed packages and build-deps takes about 10 minutes (depending mostly on download speed for all the packages). Of course on a more complex package, compilation time may start to be a factor.
Anyway, the 10-minute time can be too slow if you’re trying to fix a tricky problem and need a fast feedback loop. Plus the process produces a lot of transient files and downloads a set of packages many times, so there’s plenty of room for improvement here.
A large part of the time spent doing the “local” part of the process is writing files to disk. One way to speed this up is to use a ramdisk to store the build. I’m too lazy and have too little RAM to use this approach, so the alternative was setting up eatmydata inside the chroot. Since these are mostly temporary files or throwaway packages, it’s OK to lose the safety of constant syncs in exchange for a huge boost in speed.
The setup for eatmydata inside the chroot is described here. This looks a bit hard to automate, but luckily we don’t have to, as recent versions of mk-sbuild simply support a –eatmydata parameter, if given this will install eatmydata inside the chroot and do the choot config file change to enable eatmydata.
Adding PPA
You can add a custom PPA to an image. Once the chroot image is built, enter the “golden master”:
sudo schroot -c source:saucy-amd64 -u root
You can add a deb line (get it from launchpad) to your sources:
cat >>/etc/apt/sources.list.d/something.list
 # Copy line here
Then you need to get the GPG key for the PPA and add it manually with the very basic tools provided in the chroot (sorry, no apt-add-repository):
apt-key add -
# Paste GPG armored key here
Then exit the golden image. After this, your builds from this chroot will be able to fetch packages from the PPA.
Again, that’s a bit of work to do for each VM. Instead, what I did was create a file in /etc/schroot/setup.d to do this automatically. You can of course replace the PPAs you need in the echo lines at the end. Name the file something like 81add-ppas:
Notice that again, I was very lazy and instead of downloading the gpg keys as shown above (as for some reason trying to run gpg from the setup script didn’t work), I just configured apt to allow unauthenticated packages. Since this sbuild is mainly for testing purposes it’s not a big deal to skip this verification step. Also, there’s some logic to automatically detect the chroot release, so the same config file works equally well for any Ubuntu release.
Apt-cacher-ng
As the name suggests, this nifty utility will cache packages so the next time you need them they’ll be fetched from local storage rather than from the network. A bit of config is needed to have sbuild download packages from here.
First, install apt-cacher-ng on the host system. You can verify it’s listening on port 3142 by any means you like.
Then, to set it up automatically in chroots, add this to the host system’s /etc/schroot/setup.d/80apt-cacher-ng (rather, create that file; it doesn’t exist by default):
#!/bin/sh
 set -e
 . "$SETUP_DATA_DIR/common-data"
 . "$SETUP_DATA_DIR/common-functions"
 . "$SETUP_DATA_DIR/common-config"
 if [ $STAGE = "setup-start" ] || [ $STAGE = "setup-recover" ]; then
 echo "# Added by the schroot setup mechanism (roadmr)" > "${CHROOT_PATH}/etc/apt/apt.conf.d/80proxy"
 echo "Acquire::http::Proxy \"http://127.0.0.1:3142\";" >> "${CHROOT_PATH}/etc/apt/apt.conf.d/80proxy"
fi
With these two setup.d scripts and the –eatmydata magic, it’s easy to create sbuild environments which will be much faster when building packages.
As a comparison, building msmtp (chosen because this tests mainly the speedup components, not needing any packages from a PPA) takes about 40 seconds with these suggested tweaks:
It looks like they’re about 3 times faster, but that’s misleading because I deliberately chose a small, quick-to-compile package. Still, you can at least reduce network and disk access very easily now. Note, also, that my test system has a fast SSD. Speedup on a traditional rotary magnetic hard-disk is likely to be much higher.